

"How To" pics of S2 battery box install on RS2'd Coupe. LOTS of PICTURES!!!
--------------------------------------------------------------------------------

Actual ABY factory installed S2 Coupe battery box
Step 1. Make a template with cardboard that outlines the top of the battery box. Measure location using reference photos of actual S2 battery box. Move all objects under area to be cut. You want to remove a piece that looks like the picture below...

Step 2. Transfer template markings to the seat pan and use a jigsaw with a fine metal cutting blade to trim out the piece.

Step 3. Clean any rough edges. Remove ALL undercoating around lip edges. Remove ALL sound-proof black stick-ons from interior lip edge. Remove ALL paint from lip edges. Weld in the battery pan. Grind the welds smooth.

Step 3. Bondo the welded perimeter. Sand and smooth it all out! Makes it look molded and factory. Who cares if nobody sees it! You'll know you did it right and not half-*****.

Step 4. Mask entire area. Protect from overspray.

Prep, prime, paint. I used Duplicolor generic RED spray can for my base coats over metal-etching primer. I then used Duplicolor Tornado Red spray I special ordered over the base coat to save the "matched paint". They are little 5 ounce cans that match well on the out side paint. Not very well to the under-sprayed seat pan, but the box is protected.
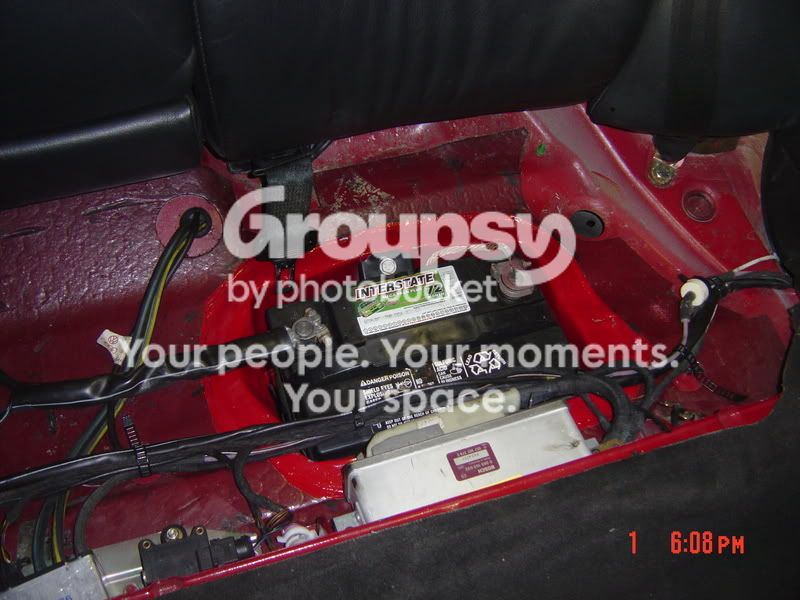
Step 5. Remove mask. Install battery. Route cables and harness' back to position. Everything fits in perfect. I used a real S2 battery cable
routed from the correct location in the engine bay's passenger side engine "fork", under the passenger side seat, and back to the battery. The second half of the harness runs along the drivers side to the fuse array under the dash. PLUG and PLAY!
Step 6. I used 3M brand 5200 series silicone sealant for the undercoating repair of the battery box. Stuff is awesome! Messy as all hell but sticks well to everything.

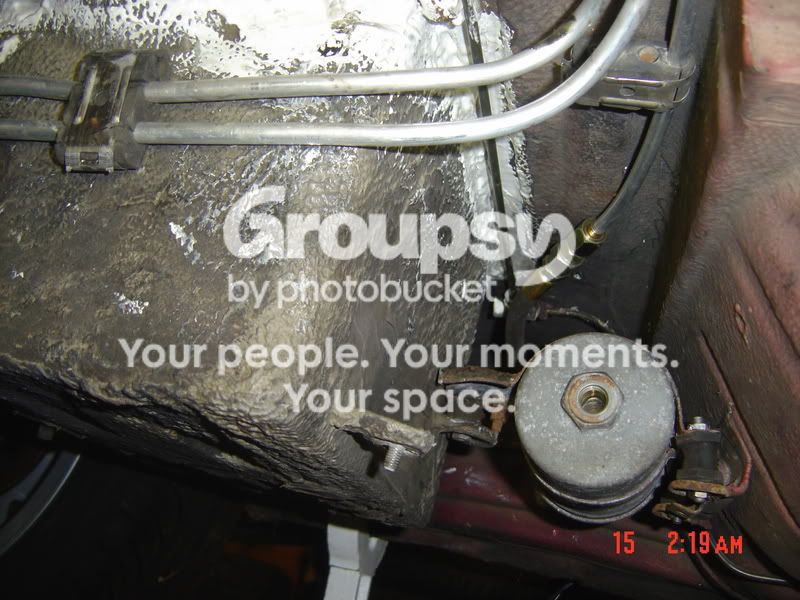
Step 7. Install new brake lines, and route new fuel lines to the mounts located on the battery box. I replaced all 3 of my fuel lines with 5/8 aluminum line from Summit since my lines were very rotten from 16 years of Ohio salt filled winters. I bought a good tube bender and flare kit. It helps to run the fuel line BEFORE you install the engine. I modified the fuel filter bracket to match a real S2 unit from a photo (which I have lost, sorry) Replaced the rubber isolator bushings and installed.
All done!
--------------------------------------------------------------------------------
Actual ABY factory installed S2 Coupe battery box
Step 1. Make a template with cardboard that outlines the top of the battery box. Measure location using reference photos of actual S2 battery box. Move all objects under area to be cut. You want to remove a piece that looks like the picture below...
Step 2. Transfer template markings to the seat pan and use a jigsaw with a fine metal cutting blade to trim out the piece.
Step 3. Clean any rough edges. Remove ALL undercoating around lip edges. Remove ALL sound-proof black stick-ons from interior lip edge. Remove ALL paint from lip edges. Weld in the battery pan. Grind the welds smooth.
Step 3. Bondo the welded perimeter. Sand and smooth it all out! Makes it look molded and factory. Who cares if nobody sees it! You'll know you did it right and not half-*****.
Step 4. Mask entire area. Protect from overspray.
Prep, prime, paint. I used Duplicolor generic RED spray can for my base coats over metal-etching primer. I then used Duplicolor Tornado Red spray I special ordered over the base coat to save the "matched paint". They are little 5 ounce cans that match well on the out side paint. Not very well to the under-sprayed seat pan, but the box is protected.
Step 5. Remove mask. Install battery. Route cables and harness' back to position. Everything fits in perfect. I used a real S2 battery cable
routed from the correct location in the engine bay's passenger side engine "fork", under the passenger side seat, and back to the battery. The second half of the harness runs along the drivers side to the fuse array under the dash. PLUG and PLAY!
Step 6. I used 3M brand 5200 series silicone sealant for the undercoating repair of the battery box. Stuff is awesome! Messy as all hell but sticks well to everything.
Step 7. Install new brake lines, and route new fuel lines to the mounts located on the battery box. I replaced all 3 of my fuel lines with 5/8 aluminum line from Summit since my lines were very rotten from 16 years of Ohio salt filled winters. I bought a good tube bender and flare kit. It helps to run the fuel line BEFORE you install the engine. I modified the fuel filter bracket to match a real S2 unit from a photo (which I have lost, sorry) Replaced the rubber isolator bushings and installed.
All done!