
Item 36, the C4 upper strut bearing/mount, PN 4A0412377C, can be removed and replaced, from the top, in about 15 minutes, with the car on the ground, with the right tools.
First thing is to purchase the Item 36, PN 4A0412377C, strut bearing(s). Get OE or a good aftermarket brand. I used Febi/Bilstein. Don't use M*y*e despite the good pricing.
Item 36 = 4A0412377C - suspension strut bearing
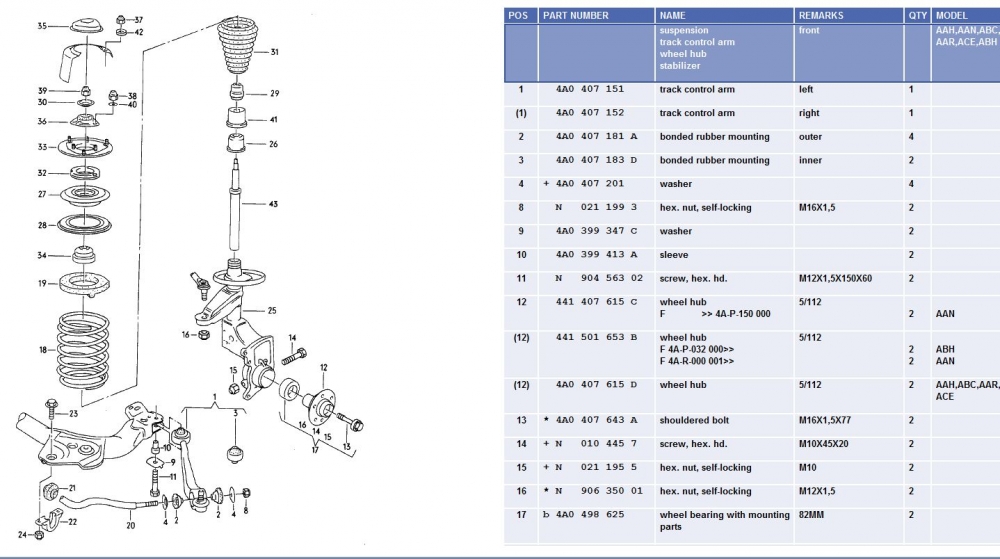
Procedure:
1. You don't even have to jack the car up. Leave it on level ground.
2. Remove the item 35 black plastic cap. Note the orientation.
3. Mark the location of the Item 36 strut bearing on the Item 33 concave support so you can get the new strut bearing (and strut) back in the same position in Step 7. (Masking tape, marker, etc).
4. Remove the Item 39 nut and Item 30 washer. In theory, you need something (a Allen wrench, etc) to hold the strut insert from rotating while you remove the top nut. Last time I did this, I just hit it with an electric impact wrench to loosen the big nut.
5. Remove the Item 38 nuts and Item 40 washers. If you didn't mark their location, mark the location of the studs now (Masking tape, marker, etc). When you remove the last nut, things might shift. No biggy. You can get it back to position later.
6. Remove the old Item 36. Note the orientation.
7. Install the new Item 36. Get the orientation right. Note: IF the old strut bearings were slotted because there are lowering springs and the slotting was needed to get the camber into some kind of spec. , e.g. -1.0 deg, then you will have to hog out the slots on the new strut bearings too. Be prepared for the extra time. (I've used a Dremel with a ceramic tile cutting bit to do that job - wear eye protection).
8. Install Item 30 washer and Item 39 nut. To tighten the nut, don't use an impact gun because you will spin the strut insert. I have done it in the car and out of the car with a O2 sensor socket and a 3/8 drive Allen socket, as shown below (from the time I had the strut out of the car to replace the Item 32 ball bearings). Torque to 44 lb-ft or good and freaking tight.
9. Install the Item 40 washers and start the Item 38 nuts by hand
10. Using the O2 socket on the Item 39 nut as a leverage handle, push/pull/nudge the strut back into position (the marks you made earlier). This can involve pushing on the fender/wing. When lined up, tighten up the Item 38 nuts. (Torque = 33 lb-ft)
11. Replace the Item 35 cap.
Done. Next.

First thing is to purchase the Item 36, PN 4A0412377C, strut bearing(s). Get OE or a good aftermarket brand. I used Febi/Bilstein. Don't use M*y*e despite the good pricing.
Item 36 = 4A0412377C - suspension strut bearing
Procedure:
1. You don't even have to jack the car up. Leave it on level ground.
2. Remove the item 35 black plastic cap. Note the orientation.
3. Mark the location of the Item 36 strut bearing on the Item 33 concave support so you can get the new strut bearing (and strut) back in the same position in Step 7. (Masking tape, marker, etc).
4. Remove the Item 39 nut and Item 30 washer. In theory, you need something (a Allen wrench, etc) to hold the strut insert from rotating while you remove the top nut. Last time I did this, I just hit it with an electric impact wrench to loosen the big nut.
5. Remove the Item 38 nuts and Item 40 washers. If you didn't mark their location, mark the location of the studs now (Masking tape, marker, etc). When you remove the last nut, things might shift. No biggy. You can get it back to position later.
6. Remove the old Item 36. Note the orientation.
7. Install the new Item 36. Get the orientation right. Note: IF the old strut bearings were slotted because there are lowering springs and the slotting was needed to get the camber into some kind of spec. , e.g. -1.0 deg, then you will have to hog out the slots on the new strut bearings too. Be prepared for the extra time. (I've used a Dremel with a ceramic tile cutting bit to do that job - wear eye protection).
8. Install Item 30 washer and Item 39 nut. To tighten the nut, don't use an impact gun because you will spin the strut insert. I have done it in the car and out of the car with a O2 sensor socket and a 3/8 drive Allen socket, as shown below (from the time I had the strut out of the car to replace the Item 32 ball bearings). Torque to 44 lb-ft or good and freaking tight.
9. Install the Item 40 washers and start the Item 38 nuts by hand
10. Using the O2 socket on the Item 39 nut as a leverage handle, push/pull/nudge the strut back into position (the marks you made earlier). This can involve pushing on the fender/wing. When lined up, tighten up the Item 38 nuts. (Torque = 33 lb-ft)

11. Replace the Item 35 cap.
Done. Next.