
This has been written based on my recent C4 experience but it might apply equally to the B4 avants. Maybe.
Reasons for removing the avant D-pillar trim might include accessing wires or removing the headliner. In my case, it was a bit of both: I needed to know how to do it in preparation for my headliner fix *AND* I needed to run a new wire pair up from the rear taillight to a new Euro C4 A6/UrS6 internal 3rd Brake light that I am installing on the hatch of my 3rd Brake Lightless 94 V8 S4 avant.
Here is your goal (well maybe not with broken attachment pins - not mine - Mike Atkisson on quattroworld was kind enough to send me the base photo so I had a clue about removing the D-pillar trim. (Kate is not very helpful on this)):

Base photo courtesy of Mike Atkisson on quattroworld
But you have to take a few steps to get there:
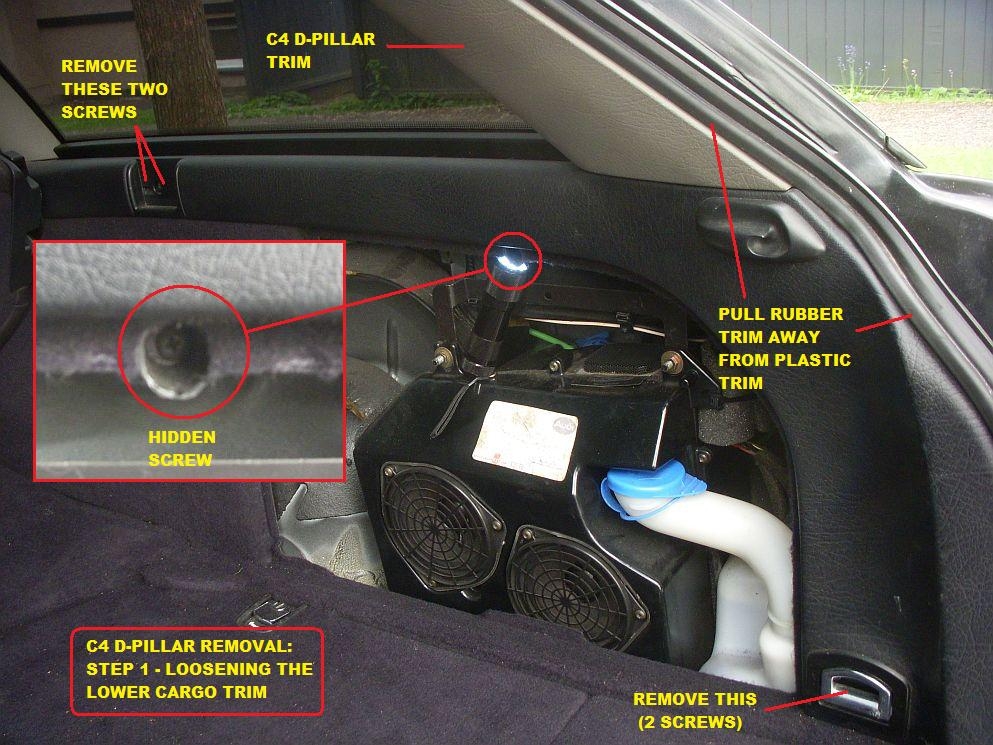
Step 1 - removing the screws and such that hold the lower cargo trim to the body, so you can pull it away from the bottom of the D-pillar trim (doesn't have to come out very much - just enough to get clearance for the bottom of the D-pillar trim):
Note the one "hidden" (in plain view) screw that I initially missed and was scratching my head ("Why isn't this MFing trim moving? OHHHH!! There's *another* screw" (Duh) - in my defense, Kate doesn't show that screw):
Step 2: Pull down the end of the upper hatch opening trim:
What you want to do is pull down the end of item 9 in this diagram - it traps the upper end of the D-pillar trim:

Here is what I am talking about:
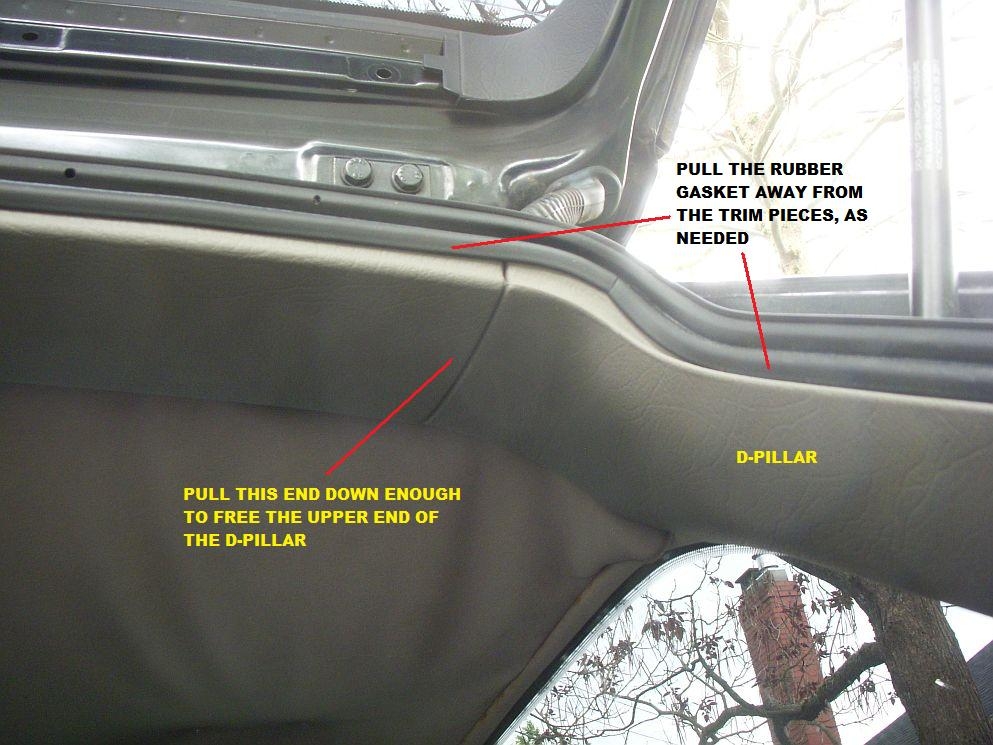
Step 3: Gently pull away any rubber hatch gasket covering the edge of the D-Pillar trim.
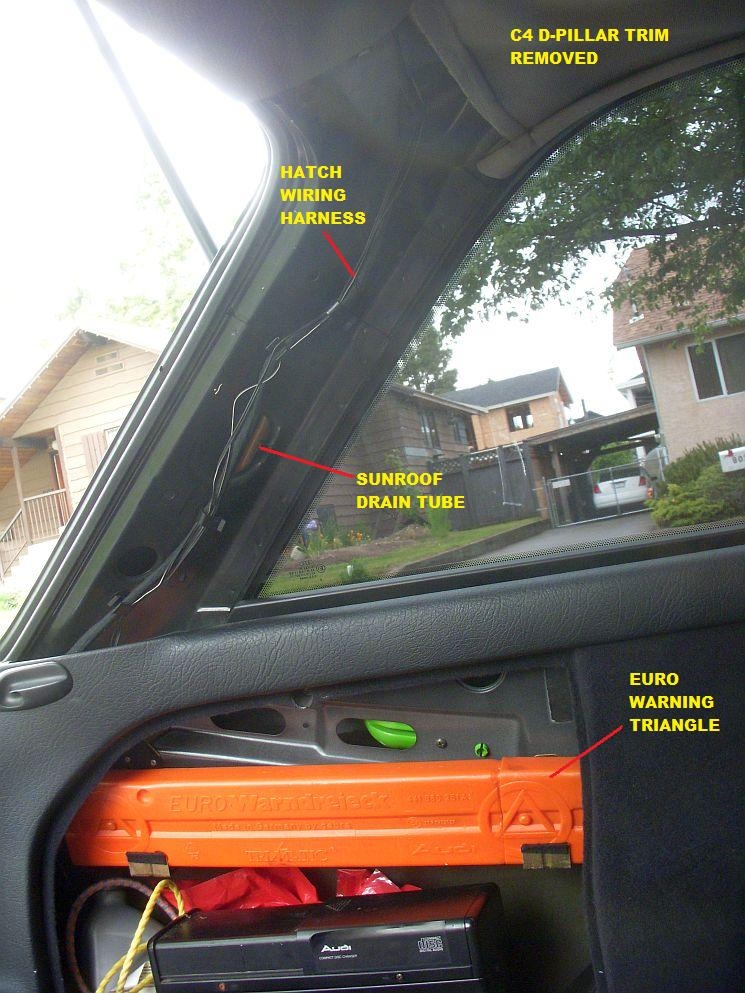
Step 4: Start gently pulling the D-pillar trim away from the body. I used both (clean) hands and started at the bottom, pulling gently but firmly until I could feel the brown attachment pins starting to pull out of the holes in the body. (Note: Even if they come away from the trim instead, you can remove them from the body and screw them into the hole in the trim prior to reinstallation). Work your way up from the bottom to the top, it gets easier as more and more brown pins pull out of the body.
Step 5: Admire the view: Wires and what not. In my case, I was able to see that the very dark tint on the rear windows was NOT factory black chrome glass as I had been told by the seller but actually a very good quality film that had been installed at some point with the trim removed. Good news/bad news - I can remove it if I want to. (Not sure if I want to)
NOTE: I took the before photos on the passenger side because I didn't take photos when I was removing the trim on the driver's side (the side that I actually needed to access to run the wires for the 3rd brake light):
Hope this helps somebody, sometime, somewhere.
Reasons for removing the avant D-pillar trim might include accessing wires or removing the headliner. In my case, it was a bit of both: I needed to know how to do it in preparation for my headliner fix *AND* I needed to run a new wire pair up from the rear taillight to a new Euro C4 A6/UrS6 internal 3rd Brake light that I am installing on the hatch of my 3rd Brake Lightless 94 V8 S4 avant.
Here is your goal (well maybe not with broken attachment pins - not mine - Mike Atkisson on quattroworld was kind enough to send me the base photo so I had a clue about removing the D-pillar trim. (Kate is not very helpful on this)):
Base photo courtesy of Mike Atkisson on quattroworld
But you have to take a few steps to get there:
Step 1 - removing the screws and such that hold the lower cargo trim to the body, so you can pull it away from the bottom of the D-pillar trim (doesn't have to come out very much - just enough to get clearance for the bottom of the D-pillar trim):
Note the one "hidden" (in plain view) screw that I initially missed and was scratching my head ("Why isn't this MFing trim moving? OHHHH!! There's *another* screw" (Duh) - in my defense, Kate doesn't show that screw):
Step 2: Pull down the end of the upper hatch opening trim:
What you want to do is pull down the end of item 9 in this diagram - it traps the upper end of the D-pillar trim:
Here is what I am talking about:
Step 3: Gently pull away any rubber hatch gasket covering the edge of the D-Pillar trim.
Step 4: Start gently pulling the D-pillar trim away from the body. I used both (clean) hands and started at the bottom, pulling gently but firmly until I could feel the brown attachment pins starting to pull out of the holes in the body. (Note: Even if they come away from the trim instead, you can remove them from the body and screw them into the hole in the trim prior to reinstallation). Work your way up from the bottom to the top, it gets easier as more and more brown pins pull out of the body.
Step 5: Admire the view: Wires and what not. In my case, I was able to see that the very dark tint on the rear windows was NOT factory black chrome glass as I had been told by the seller but actually a very good quality film that had been installed at some point with the trim removed. Good news/bad news - I can remove it if I want to. (Not sure if I want to)
NOTE: I took the before photos on the passenger side because I didn't take photos when I was removing the trim on the driver's side (the side that I actually needed to access to run the wires for the 3rd brake light):
Hope this helps somebody, sometime, somewhere.


Comment