
 Tweet
Tweet
My CQ had been suffering from an extremely slack gear shift, coupled with difficulty in getting into 5th and a very notchy shift into 3rd. I'd already replaced the shifter bush, and this made very little noticeable differnce so i decided to replace the full linkage arm.
From reading up the universal joints wear and cause the slack in the mechanism, so this was my problem.
Mcandmar kindly offered up his spare new 5 spd linkage for me at an excellent price - thanks Mark
This was actually a pretty easy job on the CQ, not as much hassle as i expected, although i think it would be tougher on the 3B due to the cats, which would probably need to come off - Could be similar on the ABY but its a completely different linkage.
Here's a brif idea of the method i used. Sorry theres not more pics but my phone was on charge when i was fitting it Hope it helps someone anyway
The linkage it accessible (just) on the o/s of the gearbox. As it was, I could undo the 10mm shift rod screw fixing on the linkage with a long extension bar beside the exhaust. That came off no problem. Then use a pry bar against the gearbox housing, and prise the linkage off the end of the shift rod - this might take some force depending on how corroded it is - mine was a tough old swine, but then my car is 18 years old!!
Once thats off you can move onto the cabin end, which is bolted to a u-shaped coupler, which in turn is bolted to the shifter.
By undoing the heatshield on the n/s you can bend it back and see the cabin end of the linkage - no way i could get anything up there to undo the 12mm bolt retaining the shifter to the linkage, but perhaps with a UJ extension you might be able to.
Instead I set about pulling the centre consile apart - remove that lot to reveal the shifter ball joint bracket. Undo the two 13mm bolts holding that down, pull the shifter up - under the ball joint there is a bolt with 10mm nut holding the shifter to the u-shaped linkage coupler. Undo that and the linkage will drop down to rest on the prop, allowing you to wriggle it out the front between the box, tunnel and the exhaust.
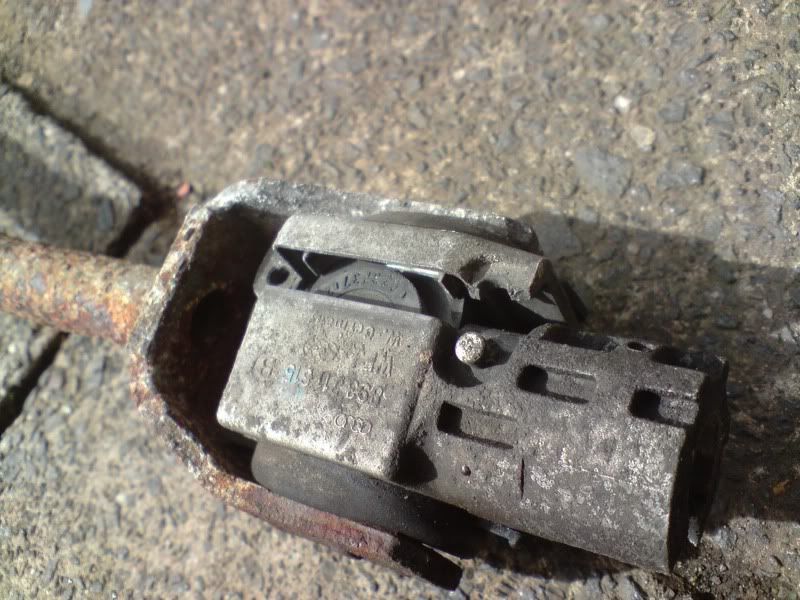
This is what greeted me - a completely fubar'd 18 year old linkage:


Then refit the new one in true Haynes style, a reversal of removal.
My new one on: job took about 1 hour from start to finish

The difference it made is fantastic. Very little play in the shifter, shorter throw and more solid gear change. I can get into 5th no problem and 3rd is better, although still a little notchy. I think an oil flush in the box will help make gear changes smoother.
Very happy with the results and highly recommended - a satisfying job where you really notice the improvement!
From reading up the universal joints wear and cause the slack in the mechanism, so this was my problem.
Mcandmar kindly offered up his spare new 5 spd linkage for me at an excellent price - thanks Mark
This was actually a pretty easy job on the CQ, not as much hassle as i expected, although i think it would be tougher on the 3B due to the cats, which would probably need to come off - Could be similar on the ABY but its a completely different linkage.
Here's a brif idea of the method i used. Sorry theres not more pics but my phone was on charge when i was fitting it
Hope it helps someone anyway The linkage it accessible (just) on the o/s of the gearbox. As it was, I could undo the 10mm shift rod screw fixing on the linkage with a long extension bar beside the exhaust. That came off no problem. Then use a pry bar against the gearbox housing, and prise the linkage off the end of the shift rod - this might take some force depending on how corroded it is - mine was a tough old swine, but then my car is 18 years old!!
Once thats off you can move onto the cabin end, which is bolted to a u-shaped coupler, which in turn is bolted to the shifter.
By undoing the heatshield on the n/s you can bend it back and see the cabin end of the linkage - no way i could get anything up there to undo the 12mm bolt retaining the shifter to the linkage, but perhaps with a UJ extension you might be able to.
Instead I set about pulling the centre consile apart - remove that lot to reveal the shifter ball joint bracket. Undo the two 13mm bolts holding that down, pull the shifter up - under the ball joint there is a bolt with 10mm nut holding the shifter to the u-shaped linkage coupler. Undo that and the linkage will drop down to rest on the prop, allowing you to wriggle it out the front between the box, tunnel and the exhaust.
This is what greeted me - a completely fubar'd 18 year old linkage:
Then refit the new one in true Haynes style, a reversal of removal.
My new one on: job took about 1 hour from start to finish
The difference it made is fantastic. Very little play in the shifter, shorter throw and more solid gear change. I can get into 5th no problem and 3rd is better, although still a little notchy. I think an oil flush in the box will help make gear changes smoother.
Very happy with the results and highly recommended - a satisfying job where you really notice the improvement!


Comment