
Well what can I say, we are nearly there now, a couple of niggly problems to fix, including one brake fitting and sorting a vacuum pipe to the vacuum assist.
My biggest regret is not taking more pictures of the progress that I have made. But there are some pictures of its current stateduring and below this post.
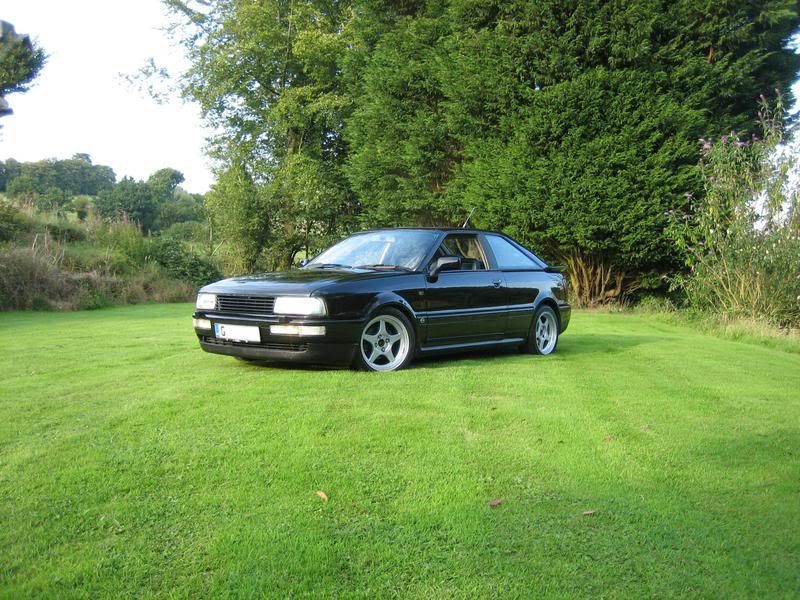
Well as you may know I started with two knackered Vehicles. My 1989 Black Coupe Quattro 2.3E Which was fitted with an RE2500 Gti Engineering KV engine, this was taken out new rings and gaskets fitted and sold to MGaz on this forum for his series 2. I let this go as soon as I knew I had secured the new engine donor.
The Donor car was Als2avant’s old 1995 Emerald Green ABY Avant.
FS thread:
Completely original and in excellent mechanical condition. But was insurance write off as some bint managed to head on remove the front corner of the car on Al’s way into work.
Coupe before engine removal:
Avant 1 week before the accident

So with these two cars a decided to embark on the mission of transferring everything that was better on the avant onto the coupe. Thus making a pretty Cool Black B3 ABY Coupe.
I obviously started by removing Engine, Box, Driveshafts, Front suspension, subframes, Props and Dashboards from both cars, and dry storing them.
Wiring
With the coupe I then disconnected all of the engine wiring loom (a mess it was virtually unbound) and then feeding it thought the bulkhead into the engine bay and removing it (bagged and stored). I then removed the dash loom (also a mess as a toad alarm was fitted) from the fuse box and removed it (bagged and stored). This s when the S2 loom was needed.
I removed the S2 loom differently as I wanted to be sure that everything I needed was included, and having never owned an S2 I didn’t really know too much about the ABY Engine and electrics (different story now) In order to make sure I didn’t have the situation of holding a random connector in my hand and saying “ahh well where does this go then?” Firstly every connector in the engine bay was labelled when disconnected. And then every connecter that was under the dash that wasn’t connected was labelled (surprising there are a few) Then the engine loom was fed backwards through the bulkhead into the car. This way I could remove the Engine loom, Dash loom and Fusebox in one unit and transfer it into the Coupe.
Obviously refitting was the reverse of removal into the Coupe. (Once the Fusebox in the coupe was disconnected from all the wiring) The spare fusebox taken from the Coupe proved to be a valuable item being able to probe each side with a multi meter to confirm continuity between pins. Then all the other wiring under the dash was fitted back onto the S2 fuse box panel. The ABY diagnostics were attached to a panel and stored under the dash (there is no place for the diagnostics on the 2.3E fusebox surround.
Engine and box refitting
The engine and box were left well alone, as the engine in standard guise was running a very healthy 246bhp when it was RR’d in the Avant.
In order to fit the ABY engine and 6speed box into the coupe, the 6-speed front subframe was required. I thought it would be wise to offer this up on its own to the Coupe. Im glad I did as this highlighted two issues. Firstly the subframe bolts on the non-s2 coupe are M10, on an s2 they are M12, so new subframe bushes were needed. But this was not a problem as the Second issue was that the 6-speed subframe was bent! Obviously when the Ford Fukus hit the drivers side corner and removed the wishbone, it bent the trailing leg of the subframe inwards. No matter as I managed to buy one from a certain blue RS2 being broken on fleabay, I stripped and painted the new rs2 subframe when it arrived and fitted it with a set of coreys anodised alloy subframe bushes (with the cq 10mm through hole).
The next issue to address was the fact that the ABY had the power sapping travesty that is CATS!!! ARGH they had to go!!!!! As my CQ is 1989 it doesn’t legally need cats. SO the Downpipe needed modifying. I took it to a South African chap called Charlie at Pro-Speed in Cardiff and he chopped the downpipe after the pipe from the wastegate and welded on a new piece from there down to just passed the CV pointing rearwards. This way I could fit the engine with it on and just take my car down for exhaust fitting without him having to fanny with the downpipe whilst on the car (mission!!)
I got this home and assembled the Box, Full Engine (inc downpipe) and subframe as one unit and shoved it into the coupe shell (I say shoved like it was easy hahaha, boy its tight!!) After a little bit of jiggling it fitted in no probs, only thing to note s that the CQ symmetrical engine mounts must be used, as it is the chassis mounting points that are different CQ vs S2 thus requiring asymmetric mounts on the s2.
All the electrics were then connected and any fittings such as Carbon canister hose fitting etc.
The only Engine bay modifications required were 1 hole needed to be drilled into the O/S chassis engine mount bracket to bolt on the oil cooler bracket. The fuel lines needed to be modified also as on the 2.3 10v they go to virtually the Airbox. I did this quite easily by cutting the 10v lines at the vertical point on the bulkhead and chopping the end sections of the S2 fuel lines off and then fitting the two together using some 8mm 90deg compression plumbing fittings (about £2 each) I then split some 8mm ID hose down the side and fitted it over the lines with cable ties. This is just to prevent any damage from rubbing that may happen. I also managed to fit the late s2 pollen filter
Modified fuel lines.

The air box fits straight in. And all the heat shielding from the s2 fits also. The s2 bonnet soundproofing was fitted to the b3 bonnet also, as there is a heat shield on the s2 item.
With this engine I have chosen to run vacuum assisted brakes, for two main reasons. Firstly the Hydraulic servo would not fit the CQ bulkhead without modification, secondly that vacuum assist is known to be more reliable and is possible in a Turbocharged car when fitted with a one-way valve, a vacuum reservoir can be fitted to improve the situation of zero ‘on boost’ assist. I have found that other cars such as Impreza’s use vaccum assist with a one-way valve with no probs at all.
This meant though that I needed to fit the PAS pump from my 10v to the S2 engine, I had to Machine an adapter bracket to do this.
Adapter bracket

The Vacuum for the assist will be from the inlet manifold currently, unless I can find some really nifty electric vacuum pump or something? But that is still being sorted at the mo.
At this stage I was able to start it up. Well I say able, I tried!! But failed. The dash lit up, I got very excited. Turned the key a little further and…….nothing!
I probed about with a multi meter and found that the starter relay was not kicking in. Quick fix was to take the jumper from the 2.3E fusebox (no relay) and bypass it. Great!!!! We have Starter, but no fuel Damn it!!!
Electrics
So what I did here, Is downloaded and printed a million sets of electrical schematics from www.S2central.net for the 2.3E (NG) ABY and ADU. After fishing though the electrics and the ABY printoffs, scratching my head and finding that nothing matched for the starter/fuel pump electric schem. I decided to take a long shot look at the RS2 schematics. It seemed a lot closer. So then I looked on here and on the web for some info on problems with starting. And I happened across the fact that 1995 onwards S2’s and RS2’s had factory alarms and immobilisers. SO… I grabed the keys, split one open and right enough, in there was a little transponder. Well Bu**er me! SO I changed the barrels over and used the s2 keys. Still nothing. After fishing around in the Avant shell amongst all the wires serching for colours I finally discovered that the ECU was waiting for a signal from the Central locking system in order to Mobilise the car, so I stripped all the CL loom and system out of the avant. And modified the loom to fit a coupe and then fitted The Unit, Loom, Horn, Door locks + handles, Door switches etc. into the Coupe. So that there is a working Audi alarm and immobiliser now fitted. Well now the starter was Clunking but not turning. This transpired to be due to a grubby connection on the starter motor. Once this was fixed it cranked a couple of times and fired up, it ran sweet as a nut….. LOUD!!! As it has nothing attached after the downpipe….But sweet!
Interior
Following that I proceeded to fit the interior back in. Only a couple of problems here, mainly that the illumination for the gauges and the heater controls doesn’t work. But I will fix that later. Way too excited to fix that just yet!
But the auto check, Temp display, Guages, switches etc, all seem to work as they should so far!!
Interior pic:

Plumbing
So now the engine bay needed to be finished, I plumbed the engine back in complete with some second hand parts from forum chappies inc:
Airbox
Aux Water pump
MAF
Cross-member
And some new parts from VAGPARTS inc:
710N
N75
All of the above were broken on the donor so needed replacing.
The intercooler was cleaned and dusted over with some spray paint. As was the AUX rad (was new gen part on the coupe last year, so used it instead of the ABY item) these were fitted to newly sprayed ABY crossmember along with a 60-70mm Samco reducer instead of the o-ring (I still have a couple of these if anybody needs one?) and an Alloy Snub bracket (als2avants design) a poly-u snub bush was fitted to the engine also (from als2avant too). This complete crossmember was then fitted to the car and all boost hoses were fitted with new beefy mikalor clamps (cheers al)
I then proceeded to chop the bo**ox out of my b3 bumper to get it to fit over the ABY intercooler.
Bumper Pics

Im not sure about this as yet, it’s a little too tight and distorting the bumper. I may need to get hold of an S2 bumper and stop trying to be a smart a** trying to fit the b3 item.
What I would ideally like is a late Cab bumper, but nobody seems to know whether this will fit over the intercooler it think it would look great on my car with the b3 badgeless grill and some brake ducts instead of fogs.
Then I decided to finally fit all the cooling so the NG rad was used and fitted with an RS2 fan which actually didn’t fit and the connections on the back of the fan were fouling the ABS unit (due to the fan motor being larger than on the NG item) SO I managed to move the brace (that goes to the slam panel) to mount to the rear edge of the radiator and without the rubber mount, this effectively twisted the rad slightly to point towards the passenger wing, I then modified the plastic panel for infront of the rad in order to fit nicely.
Rad fitting pic:

Transmission
After doing this, the only thing then to be sorted was the transmission, which contrary to what I believed at the time (especially after the problems I had trying to fit s2 hubs last year) was actually a piece of p**s. I managed to salvage 2 nearly new Wishbones (one from each car) painted them up and fitted them both with Powerflex bushes. The ABY drivshafts were then fitted to the car after being cleaned and repacked with new molybdenum grease and new outer CV boots fitted. The hubs that were used were 20v items in order to accommodated the spline size of the ABY outer CV’s these were cleaned up (a small metal sleeve had to be removed from the inside of the hub to allow the cv to fit in and turn as it should) and then fitted, everything was bolted up tight. New directional x-drilled 20v discs were fitted and new OEM pads (all I could get hold of at the time, EBC reds will be fitted) and the S2 calipers from the donor car are now fitted.
Wheel +brake pics

I know what you are all going to say at this point….PORSCHE brakes PORSCHE brakes!! To answer this…basically, the s2 brakes are an improvement over what I had before, and Porsche brakes WILL be fitted when my budget allows, I intend to fit the front hubs from the Avant and use the Hub Flanges from the Avant rears in my Coupe rear hubs. And then build up the smaller 314mm Porsche brakes to fit and use the avant’s 16” Avus wheels painted in light gunmetal bronze metallic. (I bet you can tell that I haven’t thought about this at all ) All this will come when I finish off the pads and discs on the current setup.
The prop then had to be fitted, I knew the Avant and coupe ones were going to be different but all 80 based quattro props have a common central UJ and Centre bearing. What I was surprised at though is that the Avant prop is A LOT shorter than the coupe prop. I was expecting it to be the other way around. This seems to be because the Avant diff is VERY long with an enclosed long shaft in its front section. Anyway I split the UJ on the coupe and removed the 17mm bolt in order to change the front half for the ABY item. The avant one couldn’t be split as the UJ was sealed. Luckily I was still able to reach the 17mm bolt with a spanner and drop the splined front section off without splitting the UJ. The new prop was reassembled and fitted a treat to the underbelly of the coupe.
Heat shield was refitted below the prop and job done. All that is left to do now is to replace a brake fitting that I damaged, bleed the brakes, refill the power steering, fill and bleed the cooling system. And then top up with oil. And finally and importantly check that every bolt is tight.
Then the car can be trailored to Pro-speed to get the exhaust reattached, then MOT time!!!
I aim to have the Car MOTed and tax it on the 1st July. Which means I will unfortunately not be able to bring it to Gti International. Might bring the little MK2 Valver down though
The rear end then needs a little attention including a Poly Diff mount and new rear calipers discs and pads. But I may do this before it goes to Pro-speed for the exhaust. Depends how I get on.
Then I will need some new springs as it is now sporting the dragster look with my CQ koni suspension. It will be either AST or H&R springs (im hoping AST at the moment)
All in all it has taken 12 weeks worth of evenings and weekends (on and off) for this conversion, not to bad really.
My only advice to anybody would be:
Use a donor car, I wouldn’t have been able to do this with just a bunch of parts. If you don’t use a donor car, do LOTS of research and don’t get an engine/loom/ ECU that has a factory immobiliser
Don’t scrap the donor until the conversion is finished or at least running. (I nearly scrapped the car a couple of weeks ago and the central locking system would have gone with it , I would have been screwed then!
Take your time, if you rush you will cut corners and regret it (that’s probably obvious though)
If you do use a donor, make the most of it!! Use all the bits that are even a little bit better than your car. Nut and bolts included!
Use lots of Plus-gas (or WD40) Wire brushing and Copper greasing!
Its not that hard, ok so ive worked on lots of cars for 8 years and its my hobby, but I am by no means a mechanic, I am still learning! And this is easily the biggest project I have ever done.
Don’t give up! Persevere!
Bear in mind that I payed only £1200 in total for my Write-off Donor (admittedly from a mate!) and I made about £1100 of that back selling my old engine out of my Coupe, and selling parts of the donor that I didn’t need. I still have about £400 worth of avant/coupe parts still to sell!
Any questions or advice drop me a PM I’d be happy to use my experience to help anyone doing an ABY/ADU conversion.
Engine bay

My biggest regret is not taking more pictures of the progress that I have made. But there are some pictures of its current stateduring and below this post.
Well as you may know I started with two knackered Vehicles. My 1989 Black Coupe Quattro 2.3E Which was fitted with an RE2500 Gti Engineering KV engine, this was taken out new rings and gaskets fitted and sold to MGaz on this forum for his series 2. I let this go as soon as I knew I had secured the new engine donor.
The Donor car was Als2avant’s old 1995 Emerald Green ABY Avant.
FS thread:

Completely original and in excellent mechanical condition. But was insurance write off as some bint managed to head on remove the front corner of the car on Al’s way into work.
Coupe before engine removal:
Avant 1 week before the accident
So with these two cars a decided to embark on the mission of transferring everything that was better on the avant onto the coupe. Thus making a pretty Cool Black B3 ABY Coupe.
I obviously started by removing Engine, Box, Driveshafts, Front suspension, subframes, Props and Dashboards from both cars, and dry storing them.
Wiring
With the coupe I then disconnected all of the engine wiring loom (a mess it was virtually unbound) and then feeding it thought the bulkhead into the engine bay and removing it (bagged and stored). I then removed the dash loom (also a mess as a toad alarm was fitted) from the fuse box and removed it (bagged and stored). This s when the S2 loom was needed.
I removed the S2 loom differently as I wanted to be sure that everything I needed was included, and having never owned an S2 I didn’t really know too much about the ABY Engine and electrics (different story now) In order to make sure I didn’t have the situation of holding a random connector in my hand and saying “ahh well where does this go then?” Firstly every connector in the engine bay was labelled when disconnected. And then every connecter that was under the dash that wasn’t connected was labelled (surprising there are a few) Then the engine loom was fed backwards through the bulkhead into the car. This way I could remove the Engine loom, Dash loom and Fusebox in one unit and transfer it into the Coupe.
Obviously refitting was the reverse of removal into the Coupe. (Once the Fusebox in the coupe was disconnected from all the wiring) The spare fusebox taken from the Coupe proved to be a valuable item being able to probe each side with a multi meter to confirm continuity between pins. Then all the other wiring under the dash was fitted back onto the S2 fuse box panel. The ABY diagnostics were attached to a panel and stored under the dash (there is no place for the diagnostics on the 2.3E fusebox surround.
Engine and box refitting
The engine and box were left well alone, as the engine in standard guise was running a very healthy 246bhp when it was RR’d in the Avant.
In order to fit the ABY engine and 6speed box into the coupe, the 6-speed front subframe was required. I thought it would be wise to offer this up on its own to the Coupe. Im glad I did as this highlighted two issues. Firstly the subframe bolts on the non-s2 coupe are M10, on an s2 they are M12, so new subframe bushes were needed. But this was not a problem as the Second issue was that the 6-speed subframe was bent! Obviously when the Ford Fukus hit the drivers side corner and removed the wishbone, it bent the trailing leg of the subframe inwards. No matter as I managed to buy one from a certain blue RS2 being broken on fleabay, I stripped and painted the new rs2 subframe when it arrived and fitted it with a set of coreys anodised alloy subframe bushes (with the cq 10mm through hole).
The next issue to address was the fact that the ABY had the power sapping travesty that is CATS!!! ARGH they had to go!!!!! As my CQ is 1989 it doesn’t legally need cats. SO the Downpipe needed modifying. I took it to a South African chap called Charlie at Pro-Speed in Cardiff and he chopped the downpipe after the pipe from the wastegate and welded on a new piece from there down to just passed the CV pointing rearwards. This way I could fit the engine with it on and just take my car down for exhaust fitting without him having to fanny with the downpipe whilst on the car (mission!!)
I got this home and assembled the Box, Full Engine (inc downpipe) and subframe as one unit and shoved it into the coupe shell (I say shoved like it was easy hahaha, boy its tight!!) After a little bit of jiggling it fitted in no probs, only thing to note s that the CQ symmetrical engine mounts must be used, as it is the chassis mounting points that are different CQ vs S2 thus requiring asymmetric mounts on the s2.
All the electrics were then connected and any fittings such as Carbon canister hose fitting etc.
The only Engine bay modifications required were 1 hole needed to be drilled into the O/S chassis engine mount bracket to bolt on the oil cooler bracket. The fuel lines needed to be modified also as on the 2.3 10v they go to virtually the Airbox. I did this quite easily by cutting the 10v lines at the vertical point on the bulkhead and chopping the end sections of the S2 fuel lines off and then fitting the two together using some 8mm 90deg compression plumbing fittings (about £2 each) I then split some 8mm ID hose down the side and fitted it over the lines with cable ties. This is just to prevent any damage from rubbing that may happen. I also managed to fit the late s2 pollen filter
Modified fuel lines.
The air box fits straight in. And all the heat shielding from the s2 fits also. The s2 bonnet soundproofing was fitted to the b3 bonnet also, as there is a heat shield on the s2 item.
With this engine I have chosen to run vacuum assisted brakes, for two main reasons. Firstly the Hydraulic servo would not fit the CQ bulkhead without modification, secondly that vacuum assist is known to be more reliable and is possible in a Turbocharged car when fitted with a one-way valve, a vacuum reservoir can be fitted to improve the situation of zero ‘on boost’ assist. I have found that other cars such as Impreza’s use vaccum assist with a one-way valve with no probs at all.
This meant though that I needed to fit the PAS pump from my 10v to the S2 engine, I had to Machine an adapter bracket to do this.
Adapter bracket
The Vacuum for the assist will be from the inlet manifold currently, unless I can find some really nifty electric vacuum pump or something? But that is still being sorted at the mo.
At this stage I was able to start it up. Well I say able, I tried!! But failed. The dash lit up, I got very excited. Turned the key a little further and…….nothing!
I probed about with a multi meter and found that the starter relay was not kicking in. Quick fix was to take the jumper from the 2.3E fusebox (no relay) and bypass it. Great!!!! We have Starter, but no fuel Damn it!!!
Electrics
So what I did here, Is downloaded and printed a million sets of electrical schematics from www.S2central.net for the 2.3E (NG) ABY and ADU. After fishing though the electrics and the ABY printoffs, scratching my head and finding that nothing matched for the starter/fuel pump electric schem. I decided to take a long shot look at the RS2 schematics. It seemed a lot closer. So then I looked on here and on the web for some info on problems with starting. And I happened across the fact that 1995 onwards S2’s and RS2’s had factory alarms and immobilisers. SO… I grabed the keys, split one open and right enough, in there was a little transponder. Well Bu**er me! SO I changed the barrels over and used the s2 keys. Still nothing. After fishing around in the Avant shell amongst all the wires serching for colours I finally discovered that the ECU was waiting for a signal from the Central locking system in order to Mobilise the car, so I stripped all the CL loom and system out of the avant. And modified the loom to fit a coupe and then fitted The Unit, Loom, Horn, Door locks + handles, Door switches etc. into the Coupe. So that there is a working Audi alarm and immobiliser now fitted. Well now the starter was Clunking but not turning. This transpired to be due to a grubby connection on the starter motor. Once this was fixed it cranked a couple of times and fired up, it ran sweet as a nut….. LOUD!!! As it has nothing attached after the downpipe….But sweet!
Interior
Following that I proceeded to fit the interior back in. Only a couple of problems here, mainly that the illumination for the gauges and the heater controls doesn’t work. But I will fix that later. Way too excited to fix that just yet!
But the auto check, Temp display, Guages, switches etc, all seem to work as they should so far!!
Interior pic:
Plumbing
So now the engine bay needed to be finished, I plumbed the engine back in complete with some second hand parts from forum chappies inc:
Airbox
Aux Water pump
MAF
Cross-member
And some new parts from VAGPARTS inc:
710N
N75
All of the above were broken on the donor so needed replacing.
The intercooler was cleaned and dusted over with some spray paint. As was the AUX rad (was new gen part on the coupe last year, so used it instead of the ABY item) these were fitted to newly sprayed ABY crossmember along with a 60-70mm Samco reducer instead of the o-ring (I still have a couple of these if anybody needs one?) and an Alloy Snub bracket (als2avants design) a poly-u snub bush was fitted to the engine also (from als2avant too). This complete crossmember was then fitted to the car and all boost hoses were fitted with new beefy mikalor clamps (cheers al)
I then proceeded to chop the bo**ox out of my b3 bumper to get it to fit over the ABY intercooler.
Bumper Pics
Im not sure about this as yet, it’s a little too tight and distorting the bumper. I may need to get hold of an S2 bumper and stop trying to be a smart a** trying to fit the b3 item.
What I would ideally like is a late Cab bumper, but nobody seems to know whether this will fit over the intercooler it think it would look great on my car with the b3 badgeless grill and some brake ducts instead of fogs.
Then I decided to finally fit all the cooling so the NG rad was used and fitted with an RS2 fan which actually didn’t fit and the connections on the back of the fan were fouling the ABS unit (due to the fan motor being larger than on the NG item) SO I managed to move the brace (that goes to the slam panel) to mount to the rear edge of the radiator and without the rubber mount, this effectively twisted the rad slightly to point towards the passenger wing, I then modified the plastic panel for infront of the rad in order to fit nicely.
Rad fitting pic:
Transmission
After doing this, the only thing then to be sorted was the transmission, which contrary to what I believed at the time (especially after the problems I had trying to fit s2 hubs last year) was actually a piece of p**s. I managed to salvage 2 nearly new Wishbones (one from each car) painted them up and fitted them both with Powerflex bushes. The ABY drivshafts were then fitted to the car after being cleaned and repacked with new molybdenum grease and new outer CV boots fitted. The hubs that were used were 20v items in order to accommodated the spline size of the ABY outer CV’s these were cleaned up (a small metal sleeve had to be removed from the inside of the hub to allow the cv to fit in and turn as it should) and then fitted, everything was bolted up tight. New directional x-drilled 20v discs were fitted and new OEM pads (all I could get hold of at the time, EBC reds will be fitted) and the S2 calipers from the donor car are now fitted.
Wheel +brake pics
I know what you are all going to say at this point….PORSCHE brakes PORSCHE brakes!! To answer this…basically, the s2 brakes are an improvement over what I had before, and Porsche brakes WILL be fitted when my budget allows, I intend to fit the front hubs from the Avant and use the Hub Flanges from the Avant rears in my Coupe rear hubs. And then build up the smaller 314mm Porsche brakes to fit and use the avant’s 16” Avus wheels painted in light gunmetal bronze metallic. (I bet you can tell that I haven’t thought about this at all
) All this will come when I finish off the pads and discs on the current setup.The prop then had to be fitted, I knew the Avant and coupe ones were going to be different but all 80 based quattro props have a common central UJ and Centre bearing. What I was surprised at though is that the Avant prop is A LOT shorter than the coupe prop. I was expecting it to be the other way around. This seems to be because the Avant diff is VERY long with an enclosed long shaft in its front section. Anyway I split the UJ on the coupe and removed the 17mm bolt in order to change the front half for the ABY item. The avant one couldn’t be split as the UJ was sealed. Luckily I was still able to reach the 17mm bolt with a spanner and drop the splined front section off without splitting the UJ. The new prop was reassembled and fitted a treat to the underbelly of the coupe.
Heat shield was refitted below the prop and job done. All that is left to do now is to replace a brake fitting that I damaged, bleed the brakes, refill the power steering, fill and bleed the cooling system. And then top up with oil. And finally and importantly check that every bolt is tight.
Then the car can be trailored to Pro-speed to get the exhaust reattached, then MOT time!!!
I aim to have the Car MOTed and tax it on the 1st July. Which means I will unfortunately not be able to bring it to Gti International. Might bring the little MK2 Valver down though
The rear end then needs a little attention including a Poly Diff mount and new rear calipers discs and pads. But I may do this before it goes to Pro-speed for the exhaust. Depends how I get on.
Then I will need some new springs as it is now sporting the dragster look with my CQ koni suspension. It will be either AST or H&R springs (im hoping AST at the moment)
All in all it has taken 12 weeks worth of evenings and weekends (on and off) for this conversion, not to bad really.
My only advice to anybody would be:
Use a donor car, I wouldn’t have been able to do this with just a bunch of parts. If you don’t use a donor car, do LOTS of research and don’t get an engine/loom/ ECU that has a factory immobiliser
Don’t scrap the donor until the conversion is finished or at least running. (I nearly scrapped the car a couple of weeks ago and the central locking system would have gone with it , I would have been screwed then!
Take your time, if you rush you will cut corners and regret it (that’s probably obvious though)
If you do use a donor, make the most of it!! Use all the bits that are even a little bit better than your car. Nut and bolts included!
Use lots of Plus-gas (or WD40) Wire brushing and Copper greasing!
Its not that hard, ok so ive worked on lots of cars for 8 years and its my hobby, but I am by no means a mechanic, I am still learning! And this is easily the biggest project I have ever done.
Don’t give up! Persevere!
Bear in mind that I payed only £1200 in total for my Write-off Donor (admittedly from a mate!) and I made about £1100 of that back selling my old engine out of my Coupe, and selling parts of the donor that I didn’t need. I still have about £400 worth of avant/coupe parts still to sell!
Any questions or advice drop me a PM I’d be happy to use my experience to help anyone doing an ABY/ADU conversion.
Engine bay


 Shame to see Al's avant is that state but at least its guts have gone to a good home


Comment