Announcement

Collapse
No announcement yet.

The Start of my RS2 Improvements

Collapse
X
 
  • Filter
  • Time
  • Show
Clear All
new posts

  • #31
    It's been a busy old weekend. We started getting ready on Friday night at which point the car looked like this.


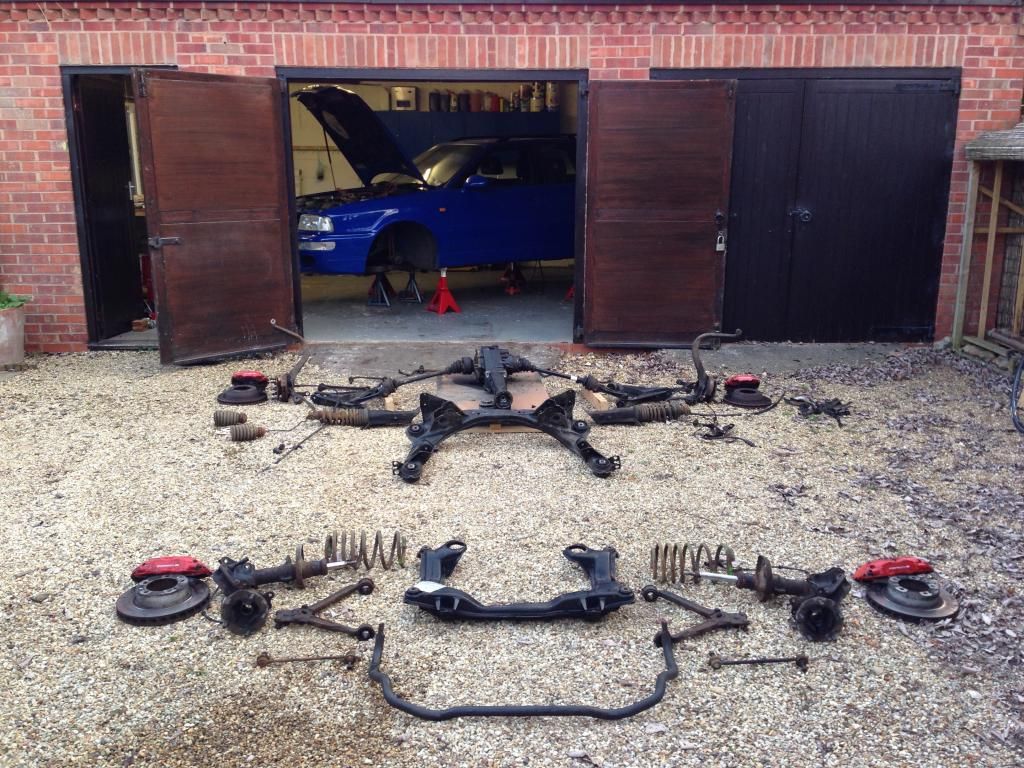
    And this afternoon, it now looks like this.


    I have to say it has been one of the most enjoyable cars I've ever stripped. Not a single seized or sheared bolt. The plating on all of the threads was still nice, even if the head looked a little grotty. A big thanks to Acidburn and the other guys who chipped on on my running gear teardown thread, the advice was spot on

    Undoing things has demonstrated why it's never driven that well. All of the bushes were well past tired and for example as we stripped the front wishbones the bushes came off in pieces.

    I'm looking forward to getting it back together to see the difference. I'm on a bit of a tight schedule as it's booked in to go to Centre Of Gravity a week on Thursday for it's alignment and corner weighting, it's a 6 week waiting list, so I can't miss my deadline. I'm having all of the bushes pressed out tomorrow and I'm then off to the powder coaters probably Wednesday or Thursday to get ready for re-assembly.

    To answer a few questions. The tie rod adjusters are the bigger Bainbridge ones he makes, as are his alloy subframe bushes and rear toe link bushes. The front wishbone bushes are those special material ones which Mance made (work of art!) and I'm using Mance mount saver 2's in stock top mounts. The balance of the bushes are Powerflex Black, it's a Neuspeed rear ARB and KW variant 3's. I've bought Apikol blue rear diff mount and bushes, but they're not here yet. Everything else is new factory parts (from TPS and Audi Tradition), engine mounts, gearbox mounts etc. It's the factory 322mm big brake set and matching rear discs and new callipers all round, Pagid RS-42 blue brake pads. Just for reference in case anyone else has the same trouble, yes the front callipers are 993 Turbo, but the rear callipers are 964 Turbo. You'll get a nasty fright asking Dr Porsche's little helpers for the price of callipers these days, they've almost trebled in price in two years, to keep up with the price of a 993 turbo!

    Ross, I saw the mod on the rear shock towers, it's a pain that the adjuster is shrouded up there. I'm guessing I've got to cut that slot. Also, front wings and tailgate are both reasonably priced. I'd guess if you bought used, you'll encounter the same problems.

    I'll keep the pictures coming
    Last edited by LGK6D; 10 January 2015, 22:34.

    Comment


    • #32
      Wow nice job and great pic

      You are so lucky not to have an issue with the rear ties. Mine were well siezed.
      Eric

      95 S2 Avant under rebuild.

      Comment


      • #33
        Great project, keep the pics coming!
        Panthero Coupé quattro 20vt
        Indigo ABY coupé
        Imola B6 S4 Avant

        Comment


        • #34
          Any updates
          1995 Audi S2 Avant

          Comment


          • #35
            Sorry it's been way to long since I updated this, but I've been kind of busy

            I'll take it up where I left off. So all the running gear was stripped and I had all of the bushes removed. That left a pile that looked like this.


            And after a strip and re-paint, that pile then looked like this. I had the alloy parts vapour blasted and all the steel parts sand blasted and powder coated.


            And so once these parts were sanitised it was time to crack open the new parts.


            Annoyingly the bump adjusters for the KW rear dampers is tucked up inside the factory rear strut holder. I've seen what a couple of other people have done and followed suit. I cut a small slot in line with the adjuster, so now the dampers can be adjusted on the car. The alternative is far too much of painful operation to ever consider adjusting the dampers once fitted.


            You can just see the adjuster through the slot.


            One completed rear strut.


            While the diff was out I cleaned and checked everything and fitted new CV boots.


            It's nice working with new parts and this is the time to make the necessary improvements. I wanted to use the proper factory callipers, but wanted to future proof them against the dreaded pad lift. The problem with these callipers is that the body is alloy and the pad plate is stainless steel. As the neither of them fit particularly well against each other, water, salt and general dirt gets in there and starts a bi-metalic corrosion process, speeded up with the addition of heat (through braking) and the pad plates end up squashing the brake pad causing a massive lack in performance and brake binding. The 993 Porsche guys have found away around this which I've done here. First thing to do is strip the pad plates out.


            Clean, polish and seal the callipers with the best waxes and sealers you've got access to. I used a Collinite 476S wax followed but Poorboys alloy wheel sealer. Next make some little masking bungs for the thread holes.


            Then I applied a high temp silicone sealant onto the pad plates. I used a Loctite product which works really well. This is a messy bit, so just go for it. This fills all of the cavities between the pad plate and calliper body so acts like a barrier. It's flexible enough to get it off again should you want to strip and clean it in the future.


            Squidge it onto the calliper.


            Give it a quick wipe down, pull the bungs out and get the screws in to pull the pad right down. You can just see the edges of the sealant towards the edges.


            While you're on the callipers, wrap the bleed nipples with PTFE tape because they do seem to like to bleed down the calliper bodies.


            There is a bit of a drama about the rear callipers. I originally thought they were a direct part from Porsche, how wrong I was. The rears are from a 928 (as are the discs), however, they are/were only ever available in black. What a flipping learning curve, so just for future reference, the RS2 rear callipers in RED are unique.

            I decided to try Pagid RS-4-2 Blues on the car. If you want these you have to order 993 Turbo fronts and 964 Turbo rears.


            At this point I should probably apologise to anyone who is intending on doing this kind of make over in the future. Most of the parts I bought to do this were the last ones in stock, it's got to that stage I'm afraid. It's so hard to by specific parts for such a low volume car. Upshot is I think I've pretty much cleared them out. It looks like this heat shield was on the shelf for some time!


            While the running gear was off, I throughly cleaned the whole underside of the car. Cut to the chase, here's the under car pics once assembled.


            Time for some measurements to get the car straight enough to drive. I've long lined cars before and it works well for such a low tech solution. I only needed to get it accurate enough to get it to Chris at the Centre of Gravity for some of his high tech alignment.


            Test drive was a success and because the MOT had expired I had it checked over. They popped it on the ramps and had a nice surprise, so much so they didn't want to give me it back. Needless to say it passed

            Comment


            • #36
              Stunning job mate its always nice to see a classic being restored to a very high standard

              Comment


              • #37
                Time for some corner weighting and alignment. I've been aware of Chris Franklin at a company called Centre of Gravity in Atherstone Warwickshire for a while - http://www.centregravity.co.uk He has a stunning reputation for being careful and precise with his work so I thought I'd give them a try. Just be aware, there is usually a hefty waiting list, especially during the summer because of the track day season.

                Even before I got there I was asked to bring the car in with a half tank of fuel to assist the weighting. Ordinarily there's a before and after drive, but because my car had been stripped to the tub, I saw very little point to driving it until it was checked over. Chris uses a Beissbarth damper tester and alignment centre as well as the latest Hunter alignment system. He seems to be favouring the Hunter at the moment for the alignment, so that's what he used. He set the car up and took an initial measurement. It seems the strings did the job as he was stunned at how square I'd got it, he said he's seen high end workshops bring cars in with much worse initial set up and went on to say it just goes to show what you can do if you're careful. There was a tiny amount of toe out at the front, but look at the rear. Bare in mind these are before measurements, I took a photo of the screen


                So Chris squared the car off. I had been using my spare set of wheel and old tyres until this stage, but now the car was square we swapped the wheels (the joys of an avant!) to my best wheels that I'd had fitted with new Goodyear Eagle F1 Asymmetric 2 - 225/45 R17 94Y which are supposed to be the best current tyre in this size and off we went for a drive. It was obvious that the KW advised settings were way over damped, which is one thing I'd mentioned upon my arrival. Chris has a test route, which is like a public Millbrook Proving ground. He's found a brilliant mix of smooth dual carriage way, bumpy B roads, smooth tight roundabouts, Belgian style cobble stones and speed bumps which he uses to see what (if anything) is wrong with the chassis and running gear. If anything's wrong it'll show up now. Back to the workshop and it's time to start measuring. The first check is to see if the dampers are working correctly, so firstly the front is parked on the Beissbarth damper checking plate. This sends a specific frequency of vibration through the dampers and draws the results on a graph. It's probably more important for cars with higher milage on the dampers, but worth the check to make sure they're working as they should. Everything checked out fine, so onto the ramp.


                The drivers seat was weighted with my body weight and also they'd calculated the weight for a full tank of fuel. The anti roll bars were disconnected and the dampers set to full soft so the spring heights could be adjusted uninterrupted until the balance of the car was perfect. He asked me how the car had previously driven, what I didn't like about it and how I hoped it would drive. Previously it had felt cumbersome, heavy and awkward. For want of a better word it was more like a Sharpe marker pen than a delicate fine liner. We discussed various alignment options and decided on something that'd make it a little more lively. Not slammed, low and unusable, more so it could cover distance at high speed. Chris is meticulous in his work to say to say the least, he works on the car like I work on the car. It's nice to see someone treat it as if it's his own, carefully and considered.

                Once the setup was complete, dampers adjusted and ARB's reconnected, all the fittings were checked to the torque values and marked. It was test drive time. We covered a similar route minus the cobbles and speed bumps. The ride is nice and the car precise. It'll hold it's line beautifully and has the delicacy which is almost impossible to believe from a lardy estate car. I have a summer and winter setting for the the rear anti roll bar and additional damper settings for track days. All in all an absolute result and worth all of the effort, handwork and expense!

                Comment


                • #38
                  Fantastic workmanship.
                  Eric

                  95 S2 Avant under rebuild.

                  Comment


                  • #39
                    Stunning in every respect. Well done.
                    The Perfectionist
                    sigpic
                    Audi Class Concours winner Stoner Park 2014, ADI Concours D'Elegance Class Winner 2008, Runner up 2014. Winner, S2Forum Show'n'Shine Billing 2006 & 2008.

                    Comment


                    • #40
                      This looks epic and makes me feel rather embarrassed about my rusting RS2 on the drive, great job and great write-up

                      Mine isn't going to look quite as pretty under the covers, but I intend on getting a good set-up on the V3's so might have to pay this place a visit when it's back together! If I can find all the bits I need now you bought them all
                      AUDI - saving Dad's from minivans since 1994

                      Comment


                      • #41
                        Top work,top thread and needless to say a top car !
                        Fantastic to see and hear of such a good job.

                        Comment


                        • #42
                          Wow wish I had the funds to do that to mine, beautiful job

                          Comment


                          • #43
                            Fantastic! What did you use to clean the underside of the car before reassembly?
                            Are you prepared to share your final alignment settings?
                            Panthero Coupé quattro 20vt
                            Indigo ABY coupé
                            Imola B6 S4 Avant

                            Comment


                            • #44
                              Originally posted by Error404 View Post
                              Fantastic! What did you use to clean the underside of the car before reassembly?
                              Are you prepared to share your final alignment settings?
                              I used a mix of stuff, but found that Bilberry wheel cleaner did the best job. Also a LOT of elbow grease I had the car quite high on the axles stands which meant i could get it throughly clean once everything was off. First time it's been cleaned in 20 years.

                              A bit of an update, while I was waiting for a couple of bits to arrive, I wanted to change the coil packs. Not that there was anything wrong with the originals, but Doug at MRC had given me a preventative maintenance schedule over the years, so it was on the to do list. I understand they go off progressively over a long duration and they're clearly the originals. I bought 5 brand new Beru packs and got the new plugs, plug boots from TPS. The pain in the bum is they won't sell the crimp on fittings so I had to source them from a number of car electrical suppliers. They are Junior Power Terminal fittings, so I bought the crimping machine and everything. I'm not a big fan of cutting and soldering when there's the choice to terminate the wires correctly. It's not a good environment to introduce a new electrical joint IMO. Here's some pics.


                              I made a note of the correct cable routing and copied it exactly. I'd bought some high temp wire sleeving from a catering company used for cookers. It's almost an identical match for the original.


                              Slipped on the new boots, you can see the new sockets on the bench I lined the lengths up with the originals.


                              These are the fittings you'll need.


                              And the crimping tool.


                              Proper job


                              Yellows done, blacks fitted


                              New sockets all fitted up.


                              Just a quick note here, the brown socket is only available in black these days, I swapped my original to keep it right.

                              The finished set.


                              Once the coil packs were done, I booked it in for its major service with MRC. The guys at MRC had given me a shopping list at the last service, so I made up a box for them with the parts from TPS and Audi Tradition. In the box was all of the auxiliary belts, cam belt, the painfully expensive water pump, thermostat, tensioner, all of the temp sensors including MFTS, pulley, bolts, lamda sensor, N75, pretty much everything else I hadn't fitted

                              They had the car for a week, everything was done with the care and attention I've learned to expect from Doug and the team and it was given a clean bill of health. It's had a couple of power runs on MRC's dyno, one of which was at the Forums Dyno Day. It usually makes around 346bhp or so. I got them to give it a run while it was there, but it only made 332bhp. They think this may have been to do with all of the new sensors making various adjustments. I've never fully known what the map was, but it was thought to be an MTM map. I got the guys to do a thorough check, while it was in and they set it up with the wide band CO2 equipment. It seemed to be running a little lean in the middle, possibly too much boost. At this point the discussion began of should we re-map the car with what MRC would recommend. It's not something they take lightly as Doug explained that they don't really enjoy re-mapping the older cars and wouldn't have agreed to do it if it wasn't in tip top condition. Doug thought he could smothen out the power delivery and even make a marginal gain. So they set to it and I was to collect the car on Saturday. They didn't tell me how much power it had made over the phone. When I arrived it had been cleaned, they rolled it out of the workshop and I was so happy to see it. I sat with Doug and chatted about bits and bobs, turns out it now makes 376bhp, but more than that the torque has gone up from 500nm to 550nm. Doug said I might notice a difference on my journey home. The most noticeable difference is how it drives at slow speeds. It was always a pain to drive slowly, it only ever wanted to go quick and was a hassle in traffic and stuff. It's now limo smooth. The weather was crappy driving home, but I did get a chance to give it a go, loads more torque so it's kind of finished now I guess. I'm not going to tune it or change anything further, it's at the top of its game. Once the nicer weather's here I'll get some nice photos, I'm going to try and get to a couple of the meets this year too

                              Comment


                              • #45
                                Top work. Thanks for sharing, both words and photos.

                                Congratulations are in order for your dedication to the cause.

                                Enjoy it and don't let anybody crash into you. Just sayin ....... as it sounds as you say 'at the top of its game'.

                                Looking forward to the photos in due course. Bring on the sun and the hot roads.


                                Comment

                                Working...
                                X