Announcement

Collapse
No announcement yet.

RS2/S2/Audi 80 Avant headliner removal DIY

Collapse
This is a sticky topic.
X
X
 
  • Filter
  • Time
  • Show
Clear All
new posts

  • #16
    Up date on my headliner....

    firstly do not trust the upholstery guy!

    I had ask him if I had to clean perfectly the surface where the new cloth coupled with the foam will be glued...
    He said: Don't bother I have a solvent that cleans everything and I'll do it....

    Result collect the headliner and the two front pillars trims, lucky enough I did'nt fit it in the car for a couple of days and discovered that the headliner was already detaching from the moulded areas sunvisor front and rear light recess rounded sides etc...

    Merda! it's not censored in this forum so I can happily use it!

    Eventually I took off the brand new cloth and started to clean the NEW and OLD glue and I can guarantee that itìs a nightmare job.
    My advise.


    Buy a glue remover that it's used for carpets and wall paper there's available I believe in every market a gelly one use that so that the cardboard/fiber pressed and precious support will suck less of it, otherwise it will affect the new glue performance.

    Use a glue paintbrush with strong and made of plastic brushes.
    Apply the glue remover and wait a couple of minutes then work with the brush on the now softer glue.
    Use a scraper and gently collect the residues (you'll need two scrapers one to collect and one to clean the first... it sticks)
    Once you removed the big part of the glue feel with your fingers for sticky still areas.
    Apply again some glue gelly remover and after a minute with a clean cloth clean the part taking care of a one way movement do not come back on the spots and don't the Karate Kid circular apply the wax move, work in lines you got to take out all of the reamining glue.
    The remover that I used it's water washable but do not even think about rinsing your now clean support it will be destroyed.
    I put it under the sun for a day and eventually it was dry and clean hence I reckon the remover evaporates.
    Last clean I used a cleaner that it's used in Hospitals cheap and very good I believe that noraml red alcohool will gain anyway the same result, to clean and to evaporate.

    You should end up with something like this:


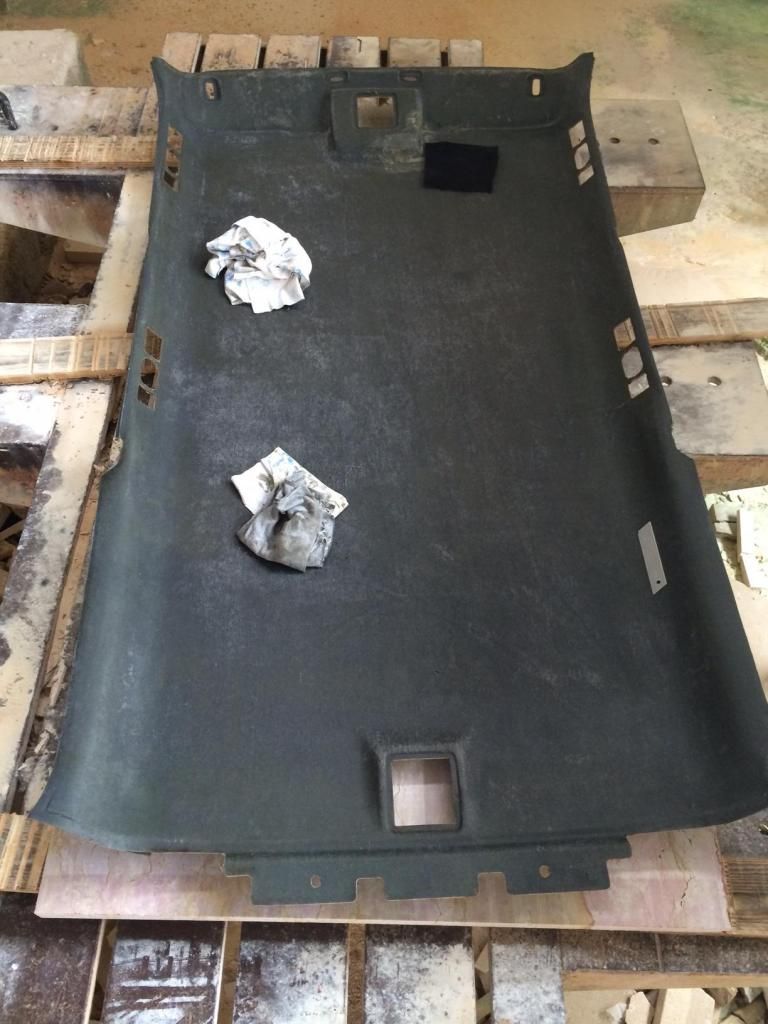
    You can see that I try also to glue a spot of the material on the moulded area and it seems (croos fingers) ok...

    Got the new cloth here for less then 10 euros per sqmt:

    http://www.autoequipe.eu/pagina2/tes...lo_auto_4.html

    It's coupled with foam nad darker then the original but not so bad as long as you do the front pillars to match

    To be continued....
    http://www.audisportclub.com/

    http://www.s2forum.com/forum/vbgoogl...227295&zoom=16

    Comment


    • #17
      Wow.. I would be furious too.

      So did he glue onto the old foam?


      You colour of your bare headliner matches mine

      Eric

      95 S2 Avant under rebuild.

      Comment


      • #18
        Nope I cleaned the foam but he glued on the old sticky glue that was underneath the old foam and the solvent story was.... well a story...
        I'm not furious for the money (he pays anyway the new cloth and labour) simply I hate to redo something because somebody did'nt apply the needed care...
        And because I want to put the car back together!

        P.S.

        Yes Eric yours seems perfectly clean how did you proceed on to clean it?
        http://www.audisportclub.com/

        http://www.s2forum.com/forum/vbgoogl...227295&zoom=16

        Comment


        • #19
          Its good he is covering costs though.

          I used a wirebrush first to get the foam, Then used a very sharp scraper. I then rubbed it down lightly with 80grit sandpaper, and then used a prepaint thinners to wipe it down.
          Eric

          95 S2 Avant under rebuild.

          Comment


          • #20
            Just finished mine so I'll type up an article soon. Tip,of the day is when putting in the sunroof switch panel in put the front lip in first and then pivot it rear words to push it in. Also the luggage anchor points are contoured for the side they fit, and the rear seat anchor bolts/points will need adjusting to get them to clip in using an Allen key!

            Comment


            • #21
              Job done!

              Hi all!

              Finally got the headliner this very morning.
              The new cloth glueing was perfect this time without problems.
              Some pictures of the result and a couple of suggestions:

              Retrim your front pillar if possible, the original light antrazit cloth it's almost impossible to find, I got it in black and hence i retrimmed the front (A?) pillars with the same material.


              Here where I put the velcro but in all honesty there's no need for it the headliner goes back nice and neat where it was before and there're plenty of positions where it's held in place, you can easily feel with your hand that the headliner it's pressed against the metal roof when everything it's been put it back together.


              http://www.audisportclub.com/

              http://www.s2forum.com/forum/vbgoogl...227295&zoom=16

              Comment


              • #22
                Hi,

                Looking good...

                The material looks quite thick, is it foam backed or what ?

                I am about to get my headliner soon in either black or charcoal alcantara, will be doing all the pillar trims and the rear trim across the hatch, not to forget the sun visors....

                Will let you know how it goes..

                P

                Comment


                • #23
                  Great job.
                  Eric

                  95 S2 Avant under rebuild.

                  Comment


                  • #24
                    Vento's post has galvanised me to add my thoughts on doing the same so here we go then my version of a headlining change on an RS2……………..

                    I have changed a couple of headlining’s in my time one from a Lancia Delta the other a Golf. Both were easy barring a few knuckle scrapes so I thought nothing of doing the Audi. The rear of the lining was billowing in the wind so it had to come out as it looked a mess and was dropping orange foam everywhere.

                    Here is a link to a coupe change on the forum and a lot of the information is relevant, especially getting the sunroof lining out:

                    http://www.s2forum.com/forum/showthr...677#post500677

                    First thing to remember is this an Audi from the days when they made cars properly so it is built to last and removing things that aren’t meant to be is hard! Also these cars are old so the plastic is brittle so prize gently. I removed my D pillars and they shattered into a million pieces, luckily I have new ones.

                    Anyway:
                    • Take the sun visors out. Screwed onto the roof so should be easy? Well yes the hinge side is but the catch side needs patience. The catch has a black oval cover which needs to be carefully prised off. It won’t feel like it at first as they are stuck on fairly solidly but it will ping off or snap! The catch has an electrical connection to it so leave it dangling.

                    This is shown with the new headliner in
                    • Now remove the overhead light/sunroof switch panel. This is the first of my pitfalls. It should be a push fit plastic panel – and it is – but the thing is the headlining has a metal surround attached onto it and the panel clips onto this (see Veneto’s photos above and you will see it around the hole left by the panel). Mine came away with the panel breaking several of the metal tabs that hold it on to the headlining. So use a paint scrapper to get between the 2 before you pull it off and ease it off, not doing what I did which was yanking like my 3 year old at a chocolate wrapper. I will tape the surround back in when I re-affix it


                    • Now remove all the overhead grab handles. Again all bar the drivers have lights in them so there will be an electrical connection
                    • Remove the luggage compartment light at the back again taking your time –same metal surround as the front panel
                    • You will now notice the headlining is going nowhere as it is glued on!
                    Next is to remove the trim pieces that hold it in
                    • Don’t remove the A pillars –more later
                    • Along the bottom of the doors you will have to remove the plastic door kick plates/sill trim. They run the length of the front and rear doors and are clipped plus but have one screw fixing in the rear footwell (could be a screw, one side of mine was, or a round plastic knob as per the original fitting)and one screw under the rear seats


                    • Lift it off checking that yours doesn’t have other fixings
                    • Under these is the rear to front wiring and I took this chance to remove the CD auto changer wiring and bits of a tow bar’s wiring (don’t ask!)
                    • Now the B pillar trim screws are exposed at their very bottom. There are 2 and these hold the plastic panel that goes from floor to roof. The top end is molded to hold the headliner


                    • Undo these and the panel should lift away from the side. No need to disconnect from the seat belt etc - just leave it dangling.
                    • Working in the load bay undo the rear seat upright anchors (a deep 19mm socket I seem to remember) and all 4 of the floor anchor points
                    • Remove the rear load lip strip which should just come off once the anchors are off
                    • Remove the rear passenger seat belt real covers from the top (prise off carefully) and then remove the guide panel underneath
                    • The side panels should lift up and away, again leaving the seat belts attached and let them dangle

                    • Throughout this you will be lowering and raising the rear seats as you see fit
                    • Marvel at the dirt everywhere!
                    • Now prize off the C and D pillars. These are fixed on with just push fittings and need very careful persuasion to come off
                    • My C pillars just about took the strain but the D pillars broke see the pics to see where the push fittings are

                    • With the D pillars the top panel that connects them has a slot in them to hold the D pillar so go carefully as you could break it pulling out the D pillar trim. Prise this panel off. Again bits of the fixings broke on mine as there should be 4 and I was left with 1! However I repaired it with hard plastic glue


                    • You will see some plastic nuts under the top trim panel with allen fixings undo these and tug them out
                    Now to get the headlining out:
                    • After all the breakages I decided not to remove the A pillars
                    • From the back gently tug the heading down and you will hear the glue “unsticking”. There is a rubber seal along the top of the rear side windows that might need folding back to get the headlining out
                    • The main problem here is the glue extends about 1-1.5m down the back so you need long arms to get between the headlining and the roof or use, as Vento and I did, a length of stiff plastic to tease it off
                    • Once the glue unsticks the headlining will begin to hang there forlornly

                    • Move to the sunroof and open it fully
                    • Look from the top and you will the headlining goes up the sides of the sunroof (as opposed to having a rubber seal as most cars of this vintage had) and at the top there is a black metal finisher. The headlining and this finisher are clipped together, the headlining having clasps glued to it, 4 along the long edges and 2 on the short ones
                    • Gently pry these apart and all of a sudden the headlining falls
                    • You can now slide it from the rear of the car in a flurry of nasty orange foam which sticks like s**t to a blanket. It will slide out of the A pillars
                    • I now decided to do as Vento did and cover all the seats with an old dust sheet! Hindsight is wonderful
                    The sunroof lining
                    • This is covered on the link above for the coupe but intrinsically the sunroof liner is fixed by 2 tabs at the front corners. The sunroof has a circular peg and the liner has a clip that fixes around the peg. This clip needs gently opening and pushing back from the peg. Best to do this when the sunroof is open as you can’t otherwise!
                    • Next slide the sunroof to tilt mode. The liner fits into 2 channels that extend from about 2/3 of the way along to the front of the sunroof on either side of the sunroof frame.
                    • Also the rear of the panel rest on a pin that extends from either side of the sunroof. This helps it tilt.
                    • With it in tilt mode slide the liner backwards out of the car

                    The material on my headlining then came off as it made its final bid for freedom. I decided to get this professional re-covered mainly due to having two kids and other demands on my time, meaning I can’t give this the full 6 hours you need to fix the material on. I was charged £180 and the job is superb compared to ones I did myself. Not bad considering the materials from Woollies would have been £60 odd plus vat.

                    Here is the re-trimmed one in a darker shade of grey and you will see marks on the lining where I have handled it. These drop out once it is in and the thing gets hot and settles down.

                    Whilst the lining was away I ordered 2 spray cans of HIGH TEMPERTURE car trimmers glue from e-bay for a tenner. The reason I highlight this is I affixed the Golf headlining with normal carpet glue and on the first hot day the glue let go and it sagged plus it seeped through the lining. I was young and even more stupid then.

                    I also fitted a DAB aerial which was a straight swop and it was easy to run the DAB aerial cable whilst the trim was off. Here is a shot of the sill trim off

                    Also used hard plastic glue (again e-bay came up trumps) to fix some of the broken clip mounts etc which is perfectly good for these panels as you won’t be ripping them off continuously.

                    Right getting it back in:
                    Reverse of the above. I hate that in Haynes manuals as you know it isn’t! The next 8 steps are for information only and are another pitfall:

                    • I sprayed the lining with the contact adhesive and sprayed the roof too for good measure -DON’T DO THIS as I have a better way! Wait to put the glue on when the headlining is in the car
                    • From the rear push the lining in
                    • Roughly align it. As it was just me it was a very rough alignment and this showed a few steps later on
                    • I placed the headlining in the A pillars and made sure t sat on the A,B,C,D pillars OK
                    • I then stuck the lining to the roof
                    • It was now that I tried to clip the sunroof trim onto the headlining and found the lining was 3 mm too far back. Doh and double doh
                    • Sprint round to the back and pull the lining down again which had stuck fast so with my heart in my mouth, I used excessive force but it stayed together –Hooray!!!
                    • The glue was allowed to set and I stared again

                    So in reality
                    • With the lining in the car get it into the A pillars. You will see in Vento’s pics that there is a strange metal top hat on the front left edge. This clicks into a recess in the roof and lets you know you’re nearly in the correct position but you can be out as I found out above
                    • Get a wiling assistance to push it forward whilst you attach the sunroof trim. This clicked in place. Before you start ensure the clips on the headlining are clear of fabric/glue etc.
                    • The headlining will hang from the sunroof and the A pillars and you can get it all looking just right up front
                    • Next I ensured it was square in the car and sat on the other pillars correctly
                    • I NOW sprayed glue on the lining and the roof – this is not too tricky and I was thankful for the dust sheet!
                    • After a couple of minutes I pushed them together and it was in
                    • I pushed the “other “ rear metal top hat into place but it didn’t play ball so I glued it up
                    • Now you just fix everything back on and, as I did, see you have broken stuff getting it off!
                    • The new D pillars are from a grey car so I used Halfords satin black vinyl spray and they look pretty good now. It is drying and is now a lovely satin black. I coloured the joiner too so they all match. Below shows a grey one, the painted one and the original. The bottom piece is the joining trim for the D pillars

                    • The rest of the trim has a few gotchas:
                    o The C pillar on the car has a lip on its rear edge, against the window that the trim must go over first or it won’t sit straight. This is a stretch

                    o The D pillars and top joining trim are a rubix cube moment with 3 parts all balanced and needing to be pressed home at the same time. Don’t forget to affix the headlining using the plastic screws first
                    o With all press on trim ensure the studs line up with the holes and guide them in. If not they have a tendency to bend and leave the trim sitting proud - this is not easy and there isn’t a quick and easy solution so persevere
                    o The anchor fixings on the load bay floor are contoured so make sure you have the correct one for the correct side/hole
                    o The seat anchors that protruded from the sides of the load bay will need adjusting after you have removed them to get them to latch properly – an allen key moment
                    • With the switch panels you will see they all have a metal spring clip one side and plastic lugs the other. The lugs go in first and this acts as a pivot so you can press the catch in to secure
                    • For the front panel the front edge goes in first and then push the rear in
                    • For the rear panel the light switch is on the left side of the car

                    Now I am sure there are short cuts to this as I bet you can squeeze the headlining out without pillar trim removal but this is just what i did!

                    Right suspension now………………….

                    Comment


                    • #25
                      Originally posted by RS2junkie View Post
                      Hi,

                      Looking good...

                      The material looks quite thick, is it foam backed or what ?

                      I am about to get my headliner soon in either black or charcoal alcantara, will be doing all the pillar trims and the rear trim across the hatch, not to forget the sun visors....

                      Will let you know how it goes..

                      P
                      The headliner it's foam backed the pillars trims are plain cloth.
                      Wanted to go as much original as I could so i compromised after long reserach on the colour.

                      Originally posted by irishs2 View Post
                      Great job.
                      Thanks Eric.
                      Nothing compared to what you did and doing on your S2.
                      Your project become my favourite together with RS2 America and I reckon it should be a perfect sample of how you should do things....
                      Last edited by veneto rs2; 19 August 2014, 18:28.
                      http://www.audisportclub.com/

                      http://www.s2forum.com/forum/vbgoogl...227295&zoom=16

                      Comment


                      • #26
                        I've just bought an avant that needs this doing.
                        Great series of write ups

                        I'm really annoyed at myself, had a perfect headlining a couple of months ago and threw it away as needed the space!
                        Think I may just take material and foam off and spray the thing black- I see if I can get my mate to make a fiberglass one in coloured gel coat instead

                        Comment


                        • #27
                          This tutorial might help as well?

                          http://www.thehogring.com/auto-uphol...vo-thread1257/
                          1980 VW Golf GTI Track Car
                          1995 Audi RS2

                          Comment


                          • #28
                            This guide is brilliant, thank you.

                            Would anyone be able to confirm if the glue used in the factory for sticking the headline to to the roof panel is solvent based?

                            And any recommendations for removal products also welcome, Victor Reinz to a product called RE-MOVE, sold as a gasket removal spray, it's solved based and may juts do the trick?

                            Thanks as always,

                            Mark

                            Comment


                            • #29
                              Mark, it's water based, I used a high pressure hose and a brush to romove the glue. Let it dry then seal it with PVA, gives a perfect finish for the new headlining.. I did a thread for n it when I changed my headlining to alcantara ...
                              Paul

                              Comment


                              • #30
                                Originally posted by RS2junkie View Post
                                Mark, it's water based, I used a high pressure hose and a brush to romove the glue. Let it dry then seal it with PVA, gives a perfect finish for the new headlining.. I did a thread for n it when I changed my headlining to alcantara ...
                                Paul
                                Hi Paul, is the glue used for attaching the headlining base (fibreboard/glass) to the metal roof panel water based? I thought it was just the glue used for laying the foam backed fabric onto the fiber panel??

                                Comment

                                Working...
                                X