Thoughts on replacing a 7A/3B or early AAN Hall sender

Collapse
X
 
  • Time
  • Show
Clear All
new posts
  • UrS4boy
    S2Forum Obsessed
    • Feb 2006
    • 11859
    • Country: Canada

    #1

    Thoughts on replacing a 7A/3B or early AAN Hall sender

    The 7A, 3B and early AANs have a Hall sender in a "distributor". In the 7A and 3B situation, the Hall sender is really in a distributor. In the case of the early AAN, the "distributor" is actually the cam position sender and looks like this one (which I call the "tuna can" dizzy because of the size and shape of the black cover):


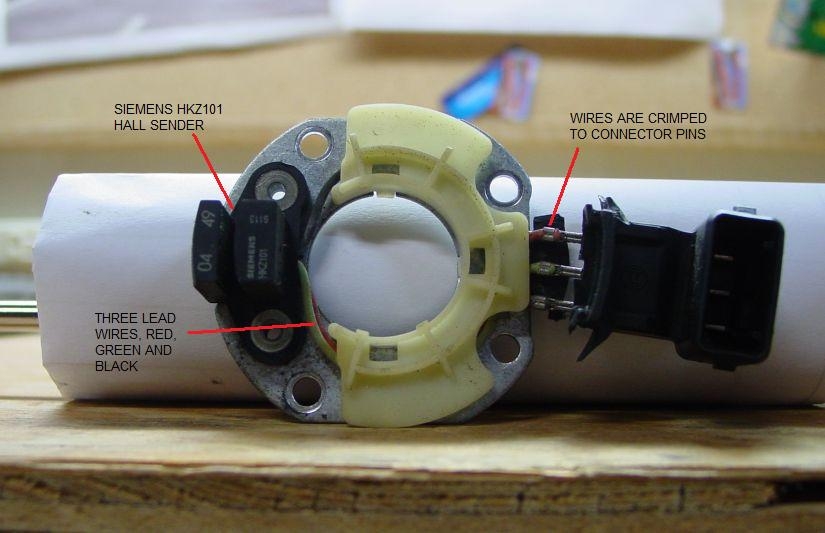
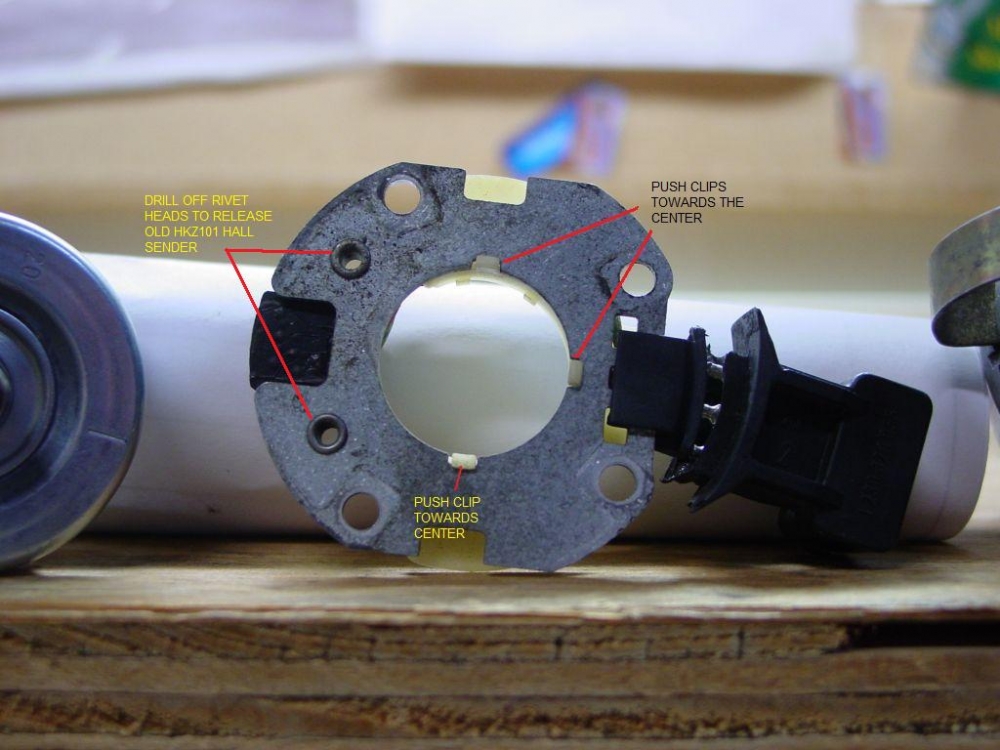
    Once the distributor is disassmbled (drive gear has to be removed to allow the shaft with the Hall sender shutter wheel and rotor post to be pulled up/out), the Hall sender plate looks like this:

    FRONT SIDE:
    Original Photo Courtesy of Bill Z.

    BACK SIDE:

    Original Photo Courtesy of Bill Z.

    The AAN "tuna can" Hall sender is an HKZ101, just like the later UrS4s (and ABYs and ADUs) (behind the cam sprocket). As a result, replacement can be an inexpensive Hall sender from BB AutoMacao. The issue is how to connect the BB Automacao sender wires to the plug connector. I think there are two options:

    1. decrimping the wires at the connectors (might be tricky) and crimping in the new sender wires or
    2. splicing the wires between the new replacement sender and the connector pins (leaving the existing crimped connections intact).


    I think if the clips on the white plastic cover are released on the back side as shown, the wires will be exposed better on the opposite (top) side, perhaps making it easier to pull the pins on the connector. If not ,splicing the wires (staggered soldered and heat shrink tubing) or soldering at the crimped connection should work.

    Removal of the existing HKZ101 is as easy as the later ones (the one behind the cam sprocket): drill off the top of the two rivet heads.

    Thoughts?
    RS2'd 93 UrS4 5 spd sedan
    94 UrS4 V8 6 spd manual avant
  • Jonas_R
    S2Forum Possessed
    • Jan 2004
    • 3780
    • Country: Denmark

    #2
    I gonna go a bit off topic here, sorry.

    Out of curiosity can you still buy the tuna can? And can it be made to fit the 3B engine?
    Sleeper S2 Avant +450

    A6 Avant 2.7t Stage 3

    Audi S2 Coupe RS2'ed

    Comment

    • UrS4boy
      S2Forum Obsessed
      • Feb 2006
      • 11859
      • Country: Canada

      #3
      Originally posted by Jonas_R
      I gonna go a bit off topic here, sorry. Out of curiosity can you still buy the tuna can? And can it be made to fit the 3B engine?
      Yes they can still be bought. However, if you are trying to convert a 3B to run an AAN ECU and five coils, I am told that you can simply use the 3B distributor and Hall sender (with some wiring patching into the AAN ECU harness). Hopefully somebody with more 3B knowledge will chime in.
      RS2'd 93 UrS4 5 spd sedan
      94 UrS4 V8 6 spd manual avant

      Comment

      • veneto rs2
        S2Forum Extremist
        • Jun 2006
        • 1022
        • Country: Veneto

        #4
        Originally posted by UrS4boy
        I think there are two options:

        1. decrimping the wires at the connectors (might be tricky) and crimping in the new sender wires or


        Thoughts?
        sliding the old spades from the connector it's not difficult assuming you have the correct tool.
        Crimping new connectors in it's not that bad the spades inside are hard to find new thoug (at least in Italy) I have done this on the coils wiring a month ago and the connector (hence the spades) are the same shape.
        As long as you have the correct tool to slide them off and the correct tool to crimp the new ones in it want be difficult.
        I spent 24 euros for the crimper and 20 euros for the pushing off tool.

        Stefano
        http://www.audisportclub.com/

        http://www.s2forum.com/forum/vbgoogl...227295&zoom=16

        Comment

        • Nuvo
          S2Forum Possessed
          • Nov 2003
          • 3825

          #5
          Option 2 is the easiest to do and a perfectly good solution. Option 1 isn't really necessary unless you are striving for perfection, I would suggest that it would be better to replace the pins with new items rather than attempting to decrimp the original pins.
          You'll need additional tools too as Stefano explains.

          You should be able to source the pins from a good auto electrics supplier.

          Comment

          • UrS4boy
            S2Forum Obsessed
            • Feb 2006
            • 11859
            • Country: Canada

            #6
            Originally posted by Nuvo
            Options 2 is the easiest to do and a perfectly good solution. Option 1 isn't really necessary unless you are striving for perfection, I would suggest you would be better replacing the pins with new items rather than attempting to decrimp the originals. You should be able to source the pins from a good auto electrics supplier.
            I would have thought so, however, I am told that those "pins" are molded into the black 90º connector. (I need confirmation of that).
            RS2'd 93 UrS4 5 spd sedan
            94 UrS4 V8 6 spd manual avant

            Comment

            • Nuvo
              S2Forum Possessed
              • Nov 2003
              • 3825

              #7
              I think you would really struggle to find pins for the 90º connector (I didn't notice this at first). I would tend to agree that you would need to source a new connector as suggested. Option 2 looks to be your best bet.
              Last edited by Nuvo; 4 January 2011, 18:21.

              Comment

              • mcandmar
                S2Forum Zealot
                • Apr 2004
                • 5118
                • Country: Ireland

                #8
                There is enough room inside the unit to splice/solder the wires together if needed. I think the back side of the connector pins had a layer of glue to hold it all in place.

                Dizzy is from my 7A, reason for the zip ties is the original plastic cover came loose and got chewed up.
                Attached Files
                91CQ20v - Gone to a new home
                93UR-S4 - The Magic Carpet
                94S2Bus - The Emerald Express

                Comment

                • UrS4boy
                  S2Forum Obsessed
                  • Feb 2006
                  • 11859
                  • Country: Canada

                  #9
                  Originally posted by mcandmar
                  There is enough room inside the unit to splice/solder the wires together if needed. I think the back side of the connector pins had a layer of glue to hold it all in place. Dizzy is from my 7A, reason for the zip ties is the original plastic cover came loose and got chewed up.
                  Thanks. Flipping the photo 180 deg. I *think* I can read Siemens HKZ101 on the Hall sender. So there is consistency between 7A, 3B and early AAN Hall senders. Drive gears not so much.
                  RS2'd 93 UrS4 5 spd sedan
                  94 UrS4 V8 6 spd manual avant

                  Comment

                  • newsh
                    S2Forum Obsessed
                    • Aug 2003
                    • 16226
                    • Country: United Kingdom

                    #10
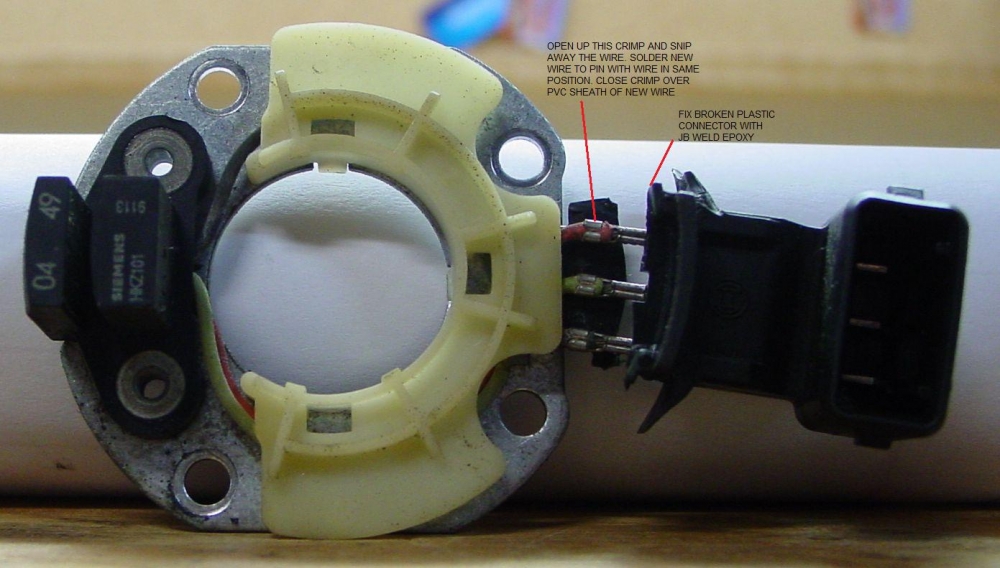
                    There are 2 parts to the crimp, the one around the conductor and the one around the sleeving, I've remade a few connectors like this before. The crimp round the conductor is very difficult to undo so I leave that alone and cut the wire off, the crimp round the cable can be unpeeled. I then solder the new wire to the crimped area that holds the old conductor and then strain relief it with the secondary crimp. You need to carefully clean and tin the pin where you're going to solder to it and tin the end of the wire then quickly sweat them together. Dab of silicon grease to stop corrosion.

                    S2 Coupe 3B Project


                    Ur quattro restoration

                    S2 Avant

                    Boost is the new rock and roll!
                    sigpic

                    Comment

                    • UrS4boy
                      S2Forum Obsessed
                      • Feb 2006
                      • 11859
                      • Country: Canada

                      #11
                      Originally posted by newsh
                      There are 2 parts to the crimp, the one around the conductor and the one around the sleeving, I've remade a few connectors like this before. The crimp round the conductor is very difficult to undo so I leave that alone and cut the wire off, the crimp round the cable can be unpeeled. I then solder the new wire to the crimped area that holds the old conductor and then strain relief it with the secondary crimp. You need to carefully clean and tin the pin where you're going to solder to it and tin the end of the wire then quickly sweat them together. Dab of silicon grease to stop corrosion.
                      Perfect. Thanks very much.
                      RS2'd 93 UrS4 5 spd sedan
                      94 UrS4 V8 6 spd manual avant

                      Comment

                      • UrS4boy
                        S2Forum Obsessed
                        • Feb 2006
                        • 11859
                        • Country: Canada

                        #12
                        How does this diagram and its labels look?

                        RS2'd 93 UrS4 5 spd sedan
                        94 UrS4 V8 6 spd manual avant

                        Comment

                        • Nuvo
                          S2Forum Possessed
                          • Nov 2003
                          • 3825

                          #13
                          The image is clear and the text instructions are easy to follow.

                          Comment

                          • UrS4boy
                            S2Forum Obsessed
                            • Feb 2006
                            • 11859
                            • Country: Canada

                            #14
                            Originally posted by Nuvo
                            The image is clear and the text instructions are easy to follow.
                            Thanks, that was my goal.

                            (Recently retired consulting engineer, former University prof).
                            RS2'd 93 UrS4 5 spd sedan
                            94 UrS4 V8 6 spd manual avant

                            Comment

                            • newsh
                              S2Forum Obsessed
                              • Aug 2003
                              • 16226
                              • Country: United Kingdom

                              #15

                              S2 Coupe 3B Project


                              Ur quattro restoration

                              S2 Avant

                              Boost is the new rock and roll!
                              sigpic

                              Comment

                              Working...