Giving the S2 some love

Collapse
X
 
  • Time
  • Show
Clear All
new posts

  • Ian Simmonds
    replied
    Originally posted by John.
    That looks nice and clean

    Did you have a problem with the coils popping off the plugs?...…..or is it just for why not!?
    Well, good question really. I never had an issue, but John at JMR found they were working loose at each annual service, so added the bar.

    Leave a comment:


  • John.
    replied
    That looks nice and clean

    Did you have a problem with the coils popping off the plugs?...…..or is it just for why not!?

    Leave a comment:


  • Ian Simmonds
    replied
    Tackled the engine bay today, it’s not concours by a long shot, but it’s 100% better than it was, you could’ve planted potatoes in there...

    Leave a comment:


  • jogi730
    replied
    Originally posted by Ian Simmonds
    Isn’t yours a standard B2 lining then Chris? They’re almost indestructible.
    I had a closer examination of mine following your comment.
    The actual roof lining itself is in good condition, although would a thorough clean. It is just on the B and C pillars where rips have appeared. I may therefore be getting just the pillars done.
    This means rear glass out, so not a DIY solution.


    Leave a comment:


  • anthonys2
    replied
    Looks like you’ve done an excellent job and you must have really challenged your patience levels doing this job certainly not one I would try!!!

    Leave a comment:


  • Ian Simmonds
    replied
    I put the S2 back together yesterday and today....

    The headliner is in and behaving itself which is reassuring.


    Several people have wondered whether to have a bash and I’ll give an honest answer.... No. Doorcards, fine, headliner = nightmare. I assumed the removal and refitting would be the main issue, but that’s just time and plodding your way through. The headliner retrim is hard, takes two people and patience but also requires speed due to the glue and no wind. You soon learn having a second go isn’t an option.

    I think the shape of the headliner around the grab handles is too severe for the headliner material and took so much working to stop it looking like a Shar-Pei Dog - even then it still wrinkles.

    interestingly, it’s been a good experience and dismantling the interior wasn’t that bad, it also allowed me to repair various bits that have been broken for years. The Audi dealer boot mounted CD autochanger wiring had been fitted by a bloke with a bulldozer, pretty much every clip down the drivers side was maimed in some way, so I’ve methodically repaired and replaced.

    If I’d give one piece of advice, it’d be remove and refit yourself over several days and let a professional Car upholstery firm do the actual retrim.
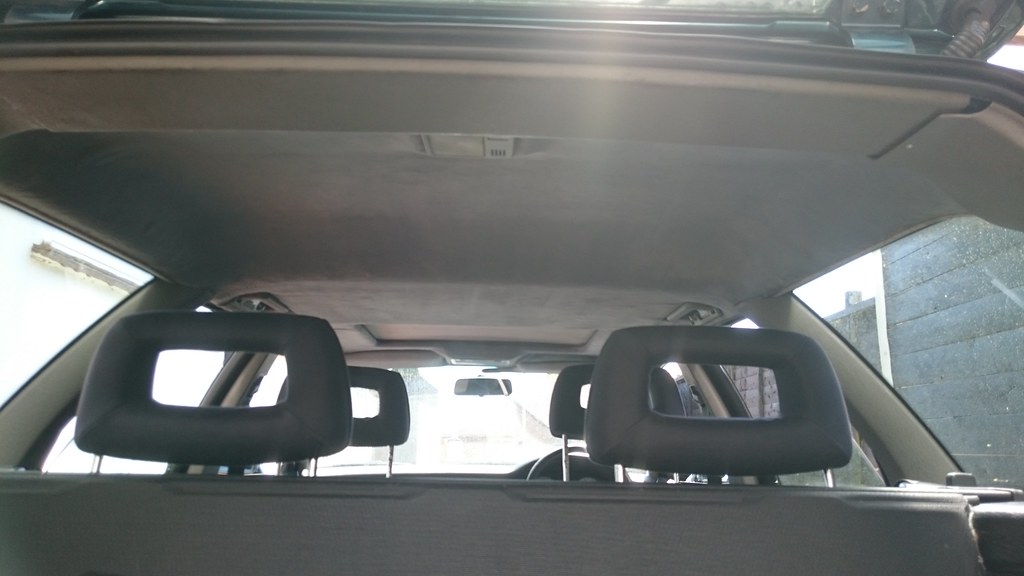


    We are now orange foam free. Whoo-hoo...

    Leave a comment:


  • s2driveruk
    replied
    Originally posted by Ian Simmonds

    The headliner is sadly postponed until I get time from work and the wind drops, as it’s an outdoors activity on a calm day.... Either that or epoxy glue the gladioli together with Faux suede....(that’s a sentence never written before)...
    some interesting pastimes down in deepest Sussex these days It seems...or is it the latest corona guidance from Boris, Stay home, get kinky, glue the gladioli

    Leave a comment:


  • Ian Simmonds
    replied
    Originally posted by s2driveruk
    Been watching this with interest, good job will be keen to see the headliner, mine has been...stapled at the back for years and its held up well with no sag but it is overdue some tlc and the door cards have gone the same way.
    The headliner is sadly postponed until I get time from work and the wind drops, as it’s an outdoors activity on a calm day.... Either that or epoxy glue the gladioli together with Faux suede....(that’s a sentence never written before)...

    Leave a comment:


  • newsh
    replied
    Originally posted by Tractor Dave
    Magnum ice cream stick works as a tool to encourage the material into the recess. Other brands are available
    Old credit card is good too

    Leave a comment:


  • s2driveruk
    replied
    Been watching this with interest, good job will be keen to see the headliner, mine has been...stapled at the back for years and its held up well with no sag but it is overdue some tlc and the door cards have gone the same way.

    Leave a comment:


  • Ian Simmonds
    replied
    Originally posted by ajax1976

    These were the same issues I had then got hacked off with so cheated, bought some leather piping and glued it down into the gap to secure the material.

    You couldn’t make it up, that’s exactly the same conversation we’ve had here, and you’re spot on, ultimately, that’s the answer...

    Leave a comment:


  • ajax1976
    replied
    Originally posted by Ian Simmonds


    ooo, there’s a question.... when you strip the old material off, including the ‘orrible foam, in the ‘trench’ of the trim boundary there’s a fine cut line from where the factory ’oversized’ the fabric slightly and then ran a knife around to trim. This is why the failing original material is ‘threading’ into ribbons. The problem with re-trimming with modern material is that the cut will be different as OEM was foam bonded to the flat surface then the thinner Audi material overlaid, which tucks into the trench. Modern material carries 3mm backing foam.

    Also, the spray foam glue doesn’t get to the bottom of the trench easily either.

    Ballsed it up several times until I worked out the best bet is to oversize the material and then cut at 45-deg versus the factory 90-deg and make sure it’s glued deep into the trench... You’ll need something that’ll force the material to the bottom of the trench and make sure it’s material from the ‘spare’ side, not stretching the door card material.

    Once the glue is on it is a race to get it seated, the flat surface is quick and bonds hard quick but the trench requires some finesse, get a tool that’ll push the material right down and remember, stretch from the spare material not the card fabric... I certainly didn’t get it right straight out of the box... The first card being less ideal than the last.

    Also, I found it better to leave the material glued and forced down into the trench until dry before cutting....

    These are only personal notes, not a “how to” but it’s a learning curve that most folk here would easily rise to.

    These were the same issues I had then got hacked off with so cheated, bought some leather piping and glued it down into the gap to secure the material.

    Leave a comment:


  • Ian Simmonds
    replied
    Originally posted by Tractor Dave
    Magnum ice cream stick works as a tool to encourage the material into the recess. Other brands are available
    Lol.... I bet that’ll do the trick spot on.... Mrs S had a funky tool like a dentist would have but with a small ball on the end. Spot on it turns out.... Mind, might have been more satisfying to have just had an ice cream....

    Leave a comment:


  • Tractor Dave
    replied
    Magnum ice cream stick works as a tool to encourage the material into the recess. Other brands are available

    Leave a comment:


  • Ian Simmonds
    replied
    Originally posted by AndyP
    That looks great, I already have the old material stripped off my door cards, but was unsure about how to get the edges looking neat, how did you manage that?

    ooo, there’s a question.... when you strip the old material off, including the ‘orrible foam, in the ‘trench’ of the trim boundary there’s a fine cut line from where the factory ’oversized’ the fabric slightly and then ran a knife around to trim. This is why the failing original material is ‘threading’ into ribbons. The problem with re-trimming with modern material is that the cut will be different as OEM was foam bonded to the flat surface then the thinner Audi material overlaid, which tucks into the trench. Modern material carries 3mm backing foam.

    Also, the spray foam glue doesn’t get to the bottom of the trench easily either.

    Ballsed it up several times until I worked out the best bet is to oversize the material and then cut at 45-deg versus the factory 90-deg and make sure it’s glued deep into the trench... You’ll need something that’ll force the material to the bottom of the trench and make sure it’s material from the ‘spare’ side, not stretching the door card material.

    Once the glue is on it is a race to get it seated, the flat surface is quick and bonds hard quick but the trench requires some finesse, get a tool that’ll push the material right down and remember, stretch from the spare material not the card fabric... I certainly didn’t get it right straight out of the box... The first card being less ideal than the last.

    Also, I found it better to leave the material glued and forced down into the trench until dry before cutting....

    These are only personal notes, not a “how to” but it’s a learning curve that most folk here would easily rise to.


    Leave a comment:

Working...