Announcement

Collapse
No announcement yet.

The '2 ton bugswatter' - back for a gentle stroke

Collapse
X
 
  • Filter
  • Time
  • Show
Clear All
new posts

  • #91
    Well a little progress update as can probably be figured out by the title change and signature I've decided to build a fresh lump.

    Before I forget ^^^^^ urS6Tom, I've had a look but can't find anything currently available to my intercooler spec.

    First of I was originally going to finish the head of first put it back on the old motor do back to back comparisons. However after careful measurement it has two definite skims left in it one for this build and one incase of unfortunate miss-happenings there may possibly be a third one in there but I'm not willing to gamble it for the sake of experimentation as there is just too many hours in the thing.

    So I've decided to run the current engine as is and get the stroker build up with this head as the end and final engine that will reside in the Bug Swatter. Once the engine swap has taken place I will most likely offer the current one for sale either as is or with fresh rings etc..with the stock head.

    Anyway enough waffle some pretty pictures instead

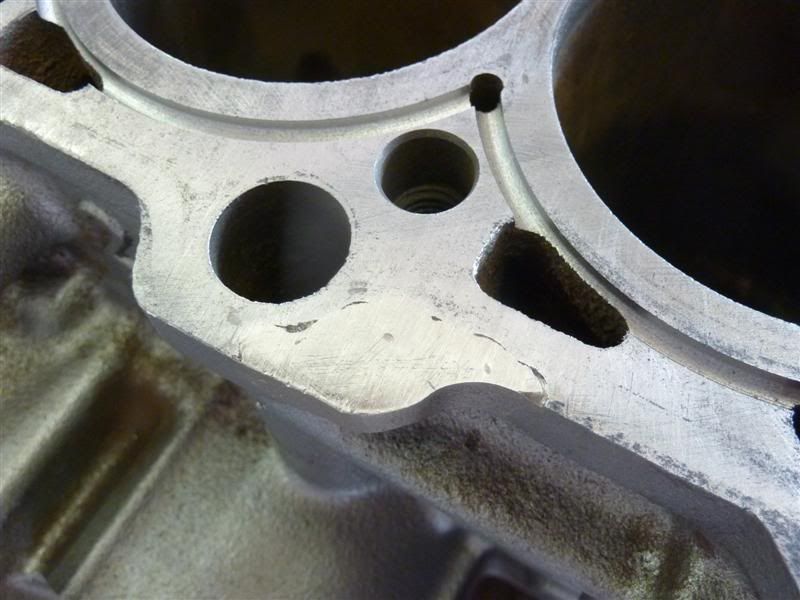
    One freshly stripped/cleaned block


    Caps and sump face machined for girdle and cap straps, Clearances measured for straps.


    Thought I'd show how mains roundness can alter with clamping loads due to an earlier thread on the forum. As you can see the height of each journal is 2.5thou taller than the width. This is consistent across all 6 of the caps which I put down to machining the caps. subsequently changing their structural rigidity when clamped down as they measured true prior to this modification.


    Glorified picture of the new steel straps that will reside inbetween the caps and girdle providing increased structural support to the crank under high load.


    Under cut ARP studs installed for improved load distribution through the stud.


    Girdle installed and torqued up, courtesy of Audi_CQ for the files and AndyP for arranging the machining.


    Now this is the fun bit, with the new clamping load the height of each mains journal has reduced by 3thou whereas the width has increased by 2.75-3thou from the previous readings. So once all the final prepwork is finished on the block it will go for a line hone to bring it back to true round under full clamping load.


    Block machined for the original crank reference sensors although I need to go a little deeper to clear the sensor 100% which I'll do when I have a dummy one to mock it up.


    Some Finnish Pornography supplied courtesy of Repo, Dials in 100% true with less than 0.5thou deflection. The last time I measured a mates hair it registered 2 thou on the verniers squashing it (apparently the average is 4)


    And the lady's rear


    I have got the clutch, pistons, miscalaneous other things and machined other bits, so I'll post up as I bother to take pictures and progress.
    UrS6 Stroker + HTA3586 =

    Comment


    • #92
      Looking at the progress you've made in the last week, the MRC dyno day in July shouldn't be a problem!
      sigpic
      1991 Audi S2 3B - 2.5 Stroker engine
      1997 A6 2.5TDi quattro avant - C4
      1976 RD250E / 350LC cafe racer

      Comment


      • #93
        If JP runs his car i'm not going on the dyno!

        Interesting the crank has been knife-edged I know Pisobiker had a thread saying he didn't know if there would be benefits on the diesel setup but then this engine is more serious than a normal road car.

        Comment


        • #94
          I must say I really like the main cap spacers. Very good idea! How long did it take to machine the caps down and measure them in the the spacers?
          Chef

          Comment


          • #95
            damn, these strokers make our 2.2 liters look like Yugos....

            Comment


            • #96
              @ Jamo, this year I'll still be on the 3076 unless I have a miraculous financial winfall before year end , so don't shy away from the dyno yet.

              As for the knife edging, it's turned the 22kg crank into 20kg stock weight. More importantly I wish to internally balance the engine which will result in swiss cheesing those counter weights so I figured I may aswell do it with less drag in the crankcase. Although I still have to finish it of amongst other things.

              @ Terrybullwon, I got the idea from the old mini engines where they where very prone to spin the mains bearing on the centre of the 3 caps when revving them high due to cap flex. So what they used to do is mill them flat and put 1" steel straps across them. So I figured 9mm shim 10mm plate is going in the right direction so may aswell do it that way for increased support.

              As for how long it took, let's just say this is one of the occasions my pocket suffered as opposed to the sleep as i just don't have the equipment to pull that of. The courtesy went to an old aerospace engineer who removed the caps and then clocked the block up along the mating face of the block to cap. He then skimmed the sump face flat which was bowed inwards towards the crank by 8 thou. He then milled all the caps as a single batch. I came in and torqued it down with the original mains bolts after which he depth mic'd it using the sump as a reference. Knowing that the girdle would have some minor distortion in it due to the lasercutting process we figured it was no point trying to shim it of the girdle as you could change the height by a couple of thou pressing on the thing. He did an excellent job clocking up though as he got 1 thou of deviation over an 18" expanse!
              UrS6 Stroker + HTA3586 =

              Comment


              • #97
                only i have to say
                RED Mitsubishi Lancer Evolution VI TME nÂş 16 of 250
                BLACK Mitsubishi Lancer Evolution VI TME nÂş 189 of 250
                LWB Audi Sport Quattro project

                Comment


                • #98
                  Originally posted by RWD19T View Post

                  As for the knife edging, it's turned the 22kg crank into 20kg stock weight. More importantly I wish to internally balance the engine which will result in swiss cheesing those counter weights so I figured I may aswell do it with less drag in the crankcase. Although I still have to finish it of amongst other things.
                  Yes I considered doing this when doing my build but opted not to when MArco point me to this http://www.s2forum.com/forum/showpos...1&postcount=61

                  I'm interested to see if the results you get will prove or disprove conventional thinking in that you gain revs but lose on torque.

                  P.S your going on 1st to the dyno

                  Comment


                  • #99
                    That's a fair few hours there Jp! Would he do another?
                    Chef

                    Comment


                    • @ Terry I'll mention it in passing under my breath next week. if I haven't been chased out the door I'll take it as a yes

                      And regarding the knife edging

                      Interesting link/post Jamo.

                      Yes I will have to agree with that post, it is very easy to make the counterweights too light resulting in the rotational mass almost having to fight the reciprocating components. Especially on a 4 pot assembly where they're zero balanced as individual assemblies, so unless keeping it under consideration there is no direct impact of crank counterweight and rod piston weight in respect to each other during the balancing process; unlike an I5 crank where the crank is balanced relative to the reciprocating mass, which means if you go too light it will show up and you have to add a heavy metal into the counterweights to counteract the lightening.

                      For this same reason the heavier diesel crank is partially so because of the extra weight in rods/pistons/wristpins. As we're changing not only to petrol components but as a general lighter reciprocating aftermarket components I was careful to maintain stock crank weight as being the limit in the weight reduction department as the baseline with any further tweaks ironed out in the balancing. It's also the reason in my choice in the length and brand of rods/wrist pin combination which I'll cover at a later date.
                      UrS6 Stroker + HTA3586 =

                      Comment


                      • Ah I was going to ask if what length rod you went for closer to the 155mm or towards the 159mm but I'll await future details!

                        Comment


                        • Jp,

                          Very educational thread. As an side issue do you have any further info on the wet cabinet you now have for cleaning the aluminum parts? You've covered all of the other items in the thread in perfect detail.

                          Thread should be made a sticky.

                          I can nearly see a desire for a GB on having heads ported.

                          Kind regards.
                          Last edited by macspring; 26 March 2011, 10:50.

                          Comment


                          • Thanks for the update JP - something tells me your mate will regret helping you out with the girdle when the flood of requests starts
                            Panthero Coupé quattro 20vt
                            Indigo ABY coupé
                            Imola B6 S4 Avant

                            Comment


                            • Been a little while since my last update as had a load of work to finish prior to going on holiday, strip down the workshop for fresh paint on the floor, a 17 day break in glorious Orlando with the family and a load of suitcases to bring home with parts for the car

                              Anyway a couple of little pics documenting what was completed before I left and some suspension mods completed today.

                              Waterway in back of block machined


                              Oil return hole taped to 1/2" NPT for an interference tapered plug to be fitted using lock n seal, and yes the block has been deck cooled.


                              Front of the block deck welded for the headgasket overhang


                              Headbolt threads cleaned up ready for the torque plate to be bolted down


                              Block overbored to 82mm after fitting High Tensile Ductile Liners, unlike the normal cast grey the Ductile liners have a much higher point of elasticity and are less susceptible to ovalling when subdued to high boost pressures on reduced rod ratios.


                              Deck surface has been mirror finished for optimum seal with a MLS gasket


                              Bottom of the bores you can see where a step has been left to sit the liner on so it cant go up or down. Although keeping in mind they have been pressed in with 5 tons of pressure I see it highly unlikely they will ever shift.


                              And now nothing to do with the engine. I needed some new top mounts as the old ones had let go. As I could never bring the camber in line with factory spec and the front tires were being eaten up at an astronomical rate on the inside edge I decided to get some Evolution topmounts from 2 Bennett.


                              Managed to fit them in under 15min per side and got the car tracked up this morning, what a difference! Car brakes much straighter feels a lot more stable through corners and not half as harsh as I though they were going to be. So all in all one of my better investments on the suspension side of things


                              Hopefully the workshop floor is going to be dry by tomorrow/Monday and I can unwrap all the rods, pistons and bearings for gapping and balancing before I send the block of for line honing on Tue.
                              UrS6 Stroker + HTA3586 =

                              Comment


                              • Nice thread, JP. I've just read through it. I like the A-series style mains straps and the deck cooling channels.
                                Thanks for sharing all the details and measurements. That is some nice kit you have at your disposal there.
                                SS

                                Comment

                                Working...
                                X